Getting your computer ready for machine learning: How, what and why you should use Anaconda, Miniconda and Conda
What are Anaconda, Miniconda and Conda? How do you create a Conda environment for machine learning? Why should you use them? This article will show you.


This article will go through what Anaconda is, what Minconda is and what Conda is, why you should know about them if you're a data scientist or machine learning engineer and how you can use them.
Your computer is capable of running many different programs and applications. However, when you want to create or write your own, such as, building a machine learning project, it's important to set your computer up in the right way.
Let's say you wanted to work with a dataset of patient records to try and predict who had heart disease or not. You'll need a few tools to do this. One for exploring the data, another for making a predictive model, one for making graphs to present your findings to others and one more to run experiments and put all the others together.
If you're thinking, I don't even know where to start, don't worry, you're not alone. Many people have this problem. Luckily, this is where Anaconda, Miniconda and Conda come in.
Anaconda, Miniconda and Conda are tools which help you manage your other tools. We'll get into the specifics of each shortly. Let's start with why they're important.
Why are Anaconda, Miniconda and Conda important?
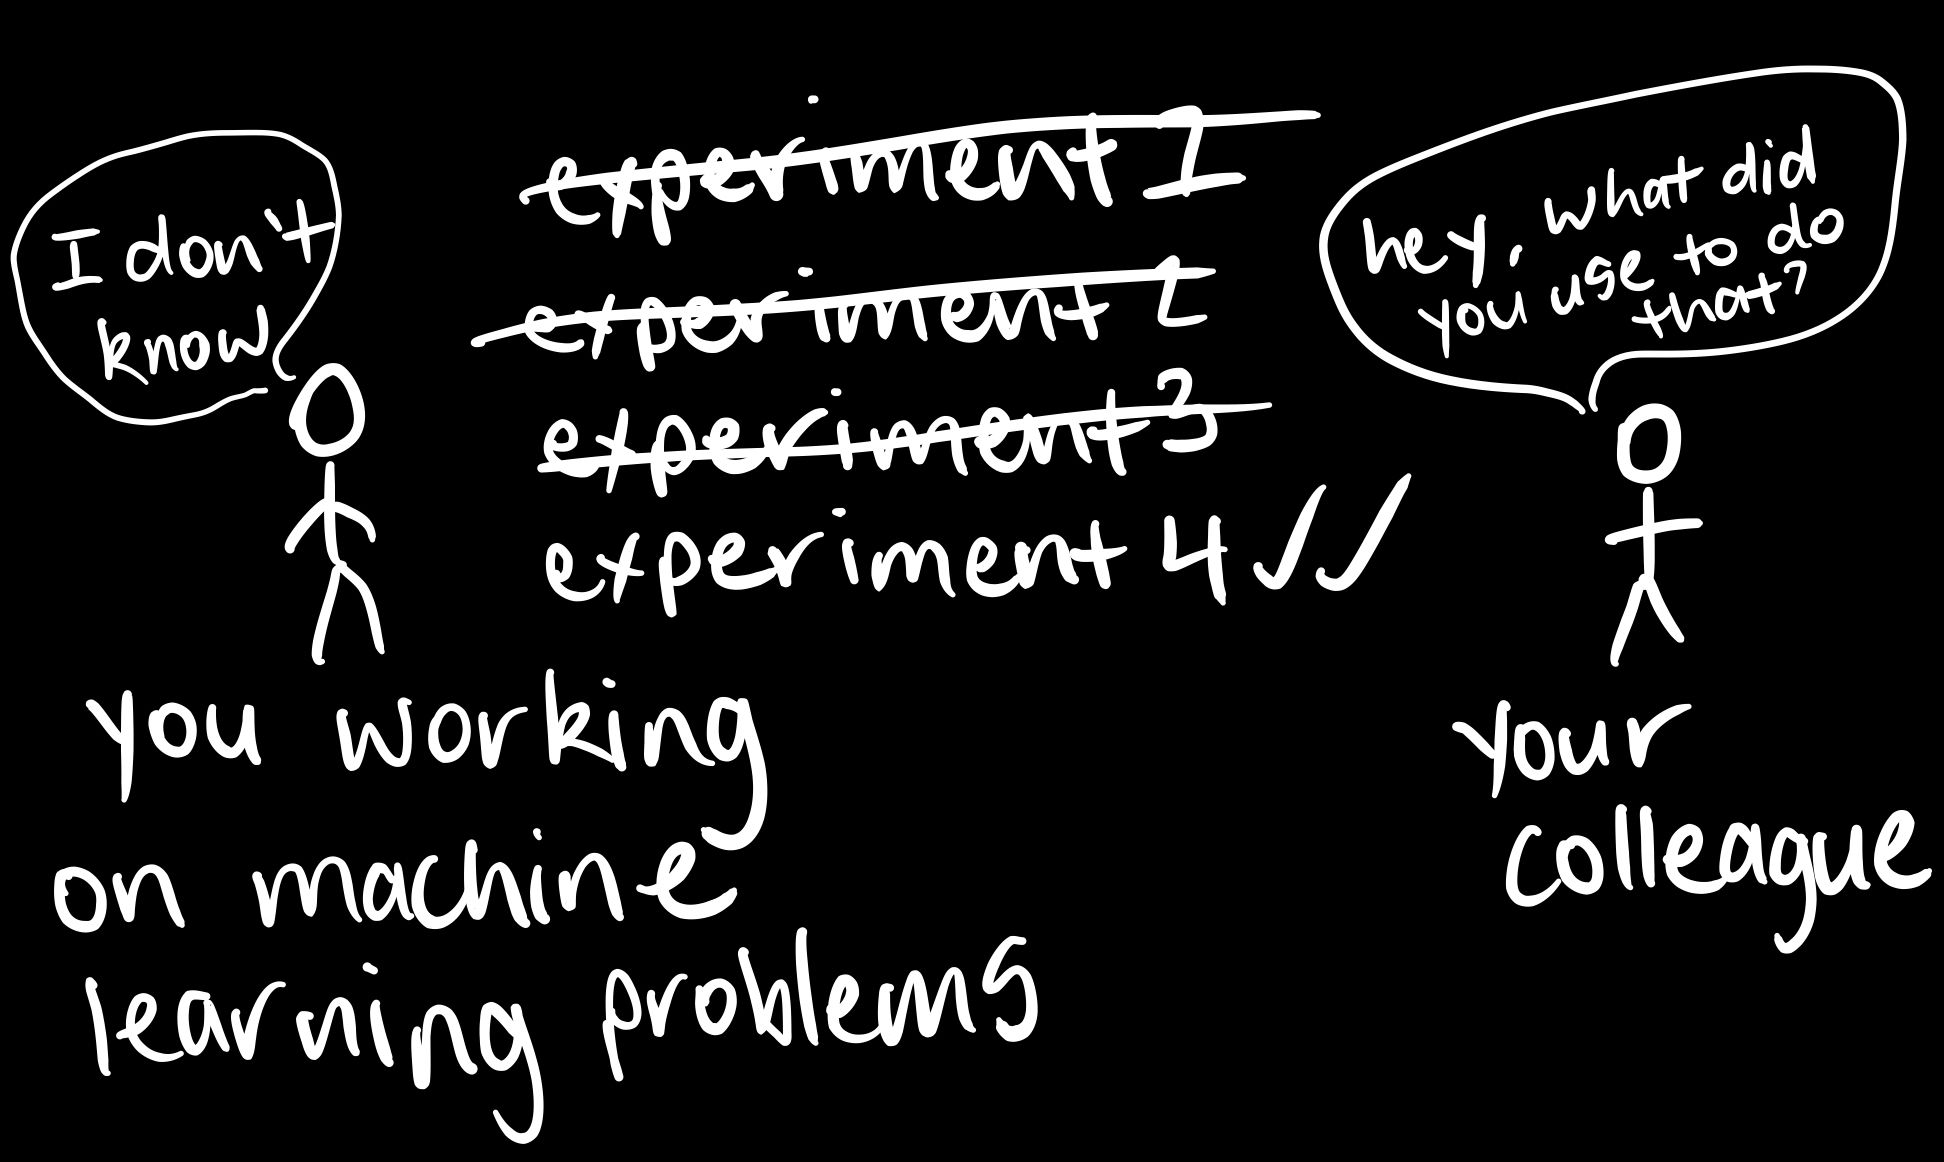
A lot of machine learning and data science is experimental. You try something and it doesn't work, then you keep trying other things until something works or nothing works at all.
If you were doing these experiments on your own and you eventually find something which works, you'll probably want to be able to do it again.
The same goes for if you wanted to share your work. Whether it be with a colleague, team or the world through an application powered by your machine learning system.
Anaconda, Miniconda and Conda provide the ability for you to share the foundation on which your experiment is built on.
Anaconda, Miniconda and Conda ensure that if someone else wanted to reproduce your work, they'd have the same tools as you.
So whether you're working solo, hacking away at a machine learning problem, or working in a team of data scientists finding insights on an internet scale dataset, Anaconda, Miniconda and Conda provide the infrastructure for a consistent experience throughout.
What are Anaconda, Miniconda and Conda?

Anaconda and Miniconda are software distributions. Anaconda comes with over 150 data science packages, everything you could imagine, where as, Miniconda comes with a handful of what's needed.
A package is a piece of code someone else has written which can be run and often serves a specific purpose. You can consider a package as a tool you can use for your own projects.
Packages are helpful because without them, you would have to write far more code to get what you need done. Since many people have similar problems, you'll often find a group of people have written code to help solve their problem and released it as a package.
Conda is a package manager. It helps you take care of your different packages by handling installing, updating and removing them.

These aren't the only ones. There's Pip, Pipenv and others too. But we'll focus on Anaconda, Miniconda and Conda. They'll be more than enough to get you started.
- Anaconda can be thought of the data scientists hardware store. It's got everything you need. From tools for exploring datasets, to tools for modelling them, to tools for visualising what you've found. Everyone can access the hardware store and all the tools inside.
- Miniconda is the workbench of a data scientist. Every workbench starts clean with only the bare necessities. But as a project grows, so do the number of tools on the workbench. They get used, they get changed, they get swapped. Each workbench can be customised however a data scientist wants. One data scientists workbench may be completely different to another, even if they're on the same team.
- Conda helps to organise all of these tools. Although Anaconda comes with many of them ready to go, sometimes they'll need changing. Conda is like the assistant who takes stock of all the tools. The same goes for Miniconda.
Another term for a collection of tools or packages is environment. The hardware store is an environment and each individual workbench is an environment.
For example, if you're working on a machine learning problem and find some insights using the tools in your environment (workbench), a teammate may ask you to share your environment with them so they can reproduce your results and contribute to the project.
Should you use Anaconda or Miniconda?
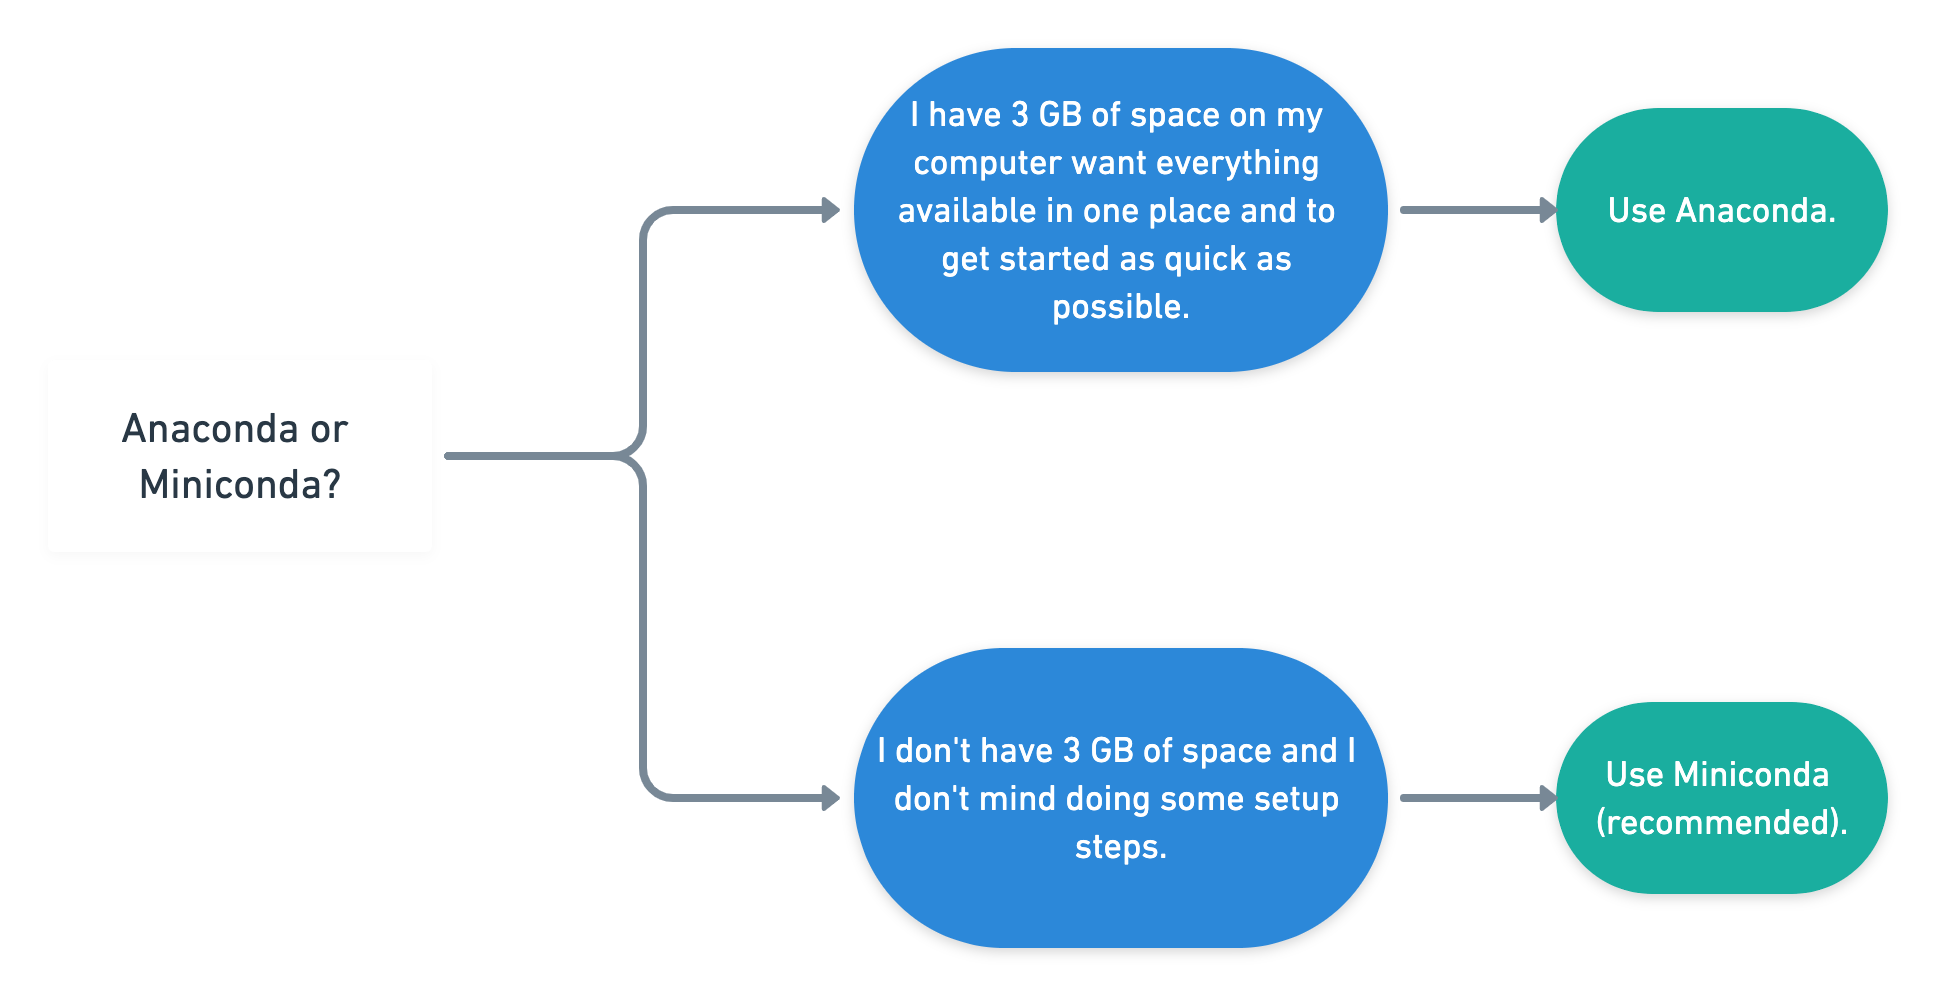
Use Anaconda:
- If you're after a one size fits all approach which works out of the box for most projects, have 3 GB of space on your computer.
Use Miniconda:
- If you don't have 3 GB of space on your computer and prefer a setup has only what you need.
Your main consideration when starting out with Anaconda or Miniconda is space on your computer.
If you've chosen Anaconda, follow the Anaconda steps. If you've chosen Miniconda, follow the Miniconda steps.
Note: Both Anaconda and Miniconda come with Conda. And because Conda is a package manager, what you can accomplish with Anaconda, you can do with Miniconda. In other words, the steps in the Miniconda section (creating a custom environment with Conda) will work after you've gone through the Anaconda section.
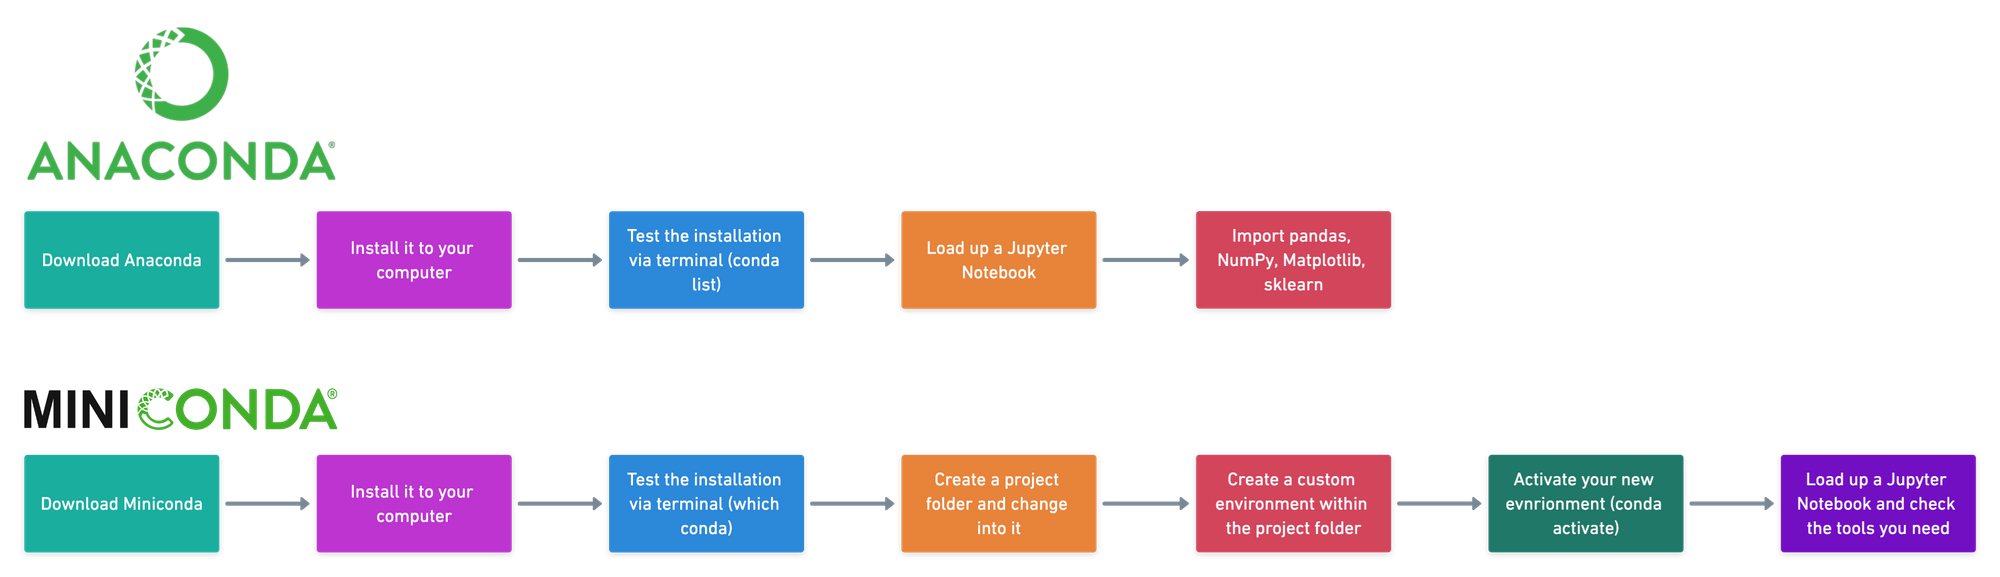
Getting a data science project up and running quickly using Anaconda
Remember, you can think of Anaconda as the hardware store of data science tools. You download it to your computer and it will bring with it the tools (packages) you need to do much of your data science or machine learning work. If it doesn't have the package you need, just like a hardware store, you can order it in (download it).
The good thing is, following these steps and installing Anaconda will install Conda too.
1. Go to the Anaconda distribution page.
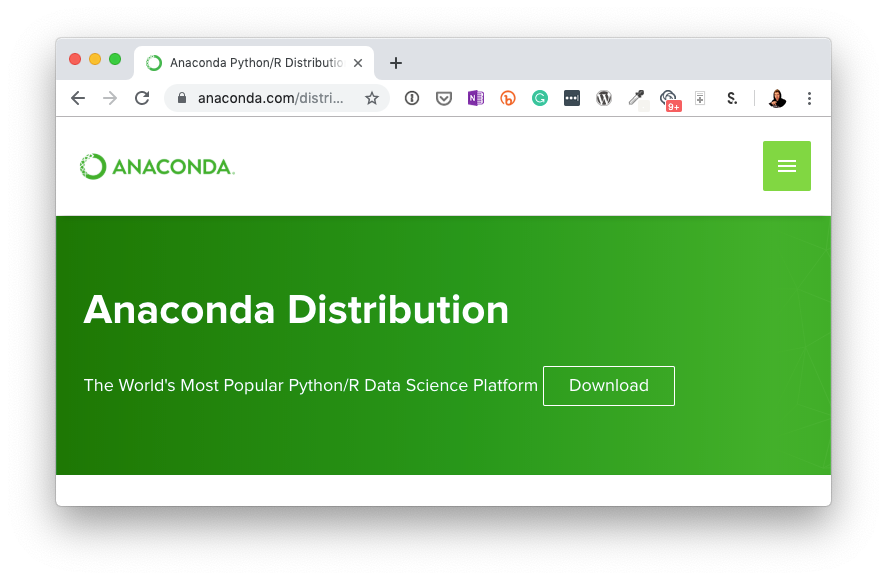
2. Download the appropriate Anaconda distribution for your computer (will take a while depending on your internet speed). Unless you have a specific reason, it's a good idea to download the latest version of each (highest number).
In my case, I downloaded the macOS Python 3.7 64-bit Graphical Installer. The difference between the command line and graphical installer is one uses an application you can see, the other requires you to write lines of code. To keep it simple, we're using the Graphical Installer.
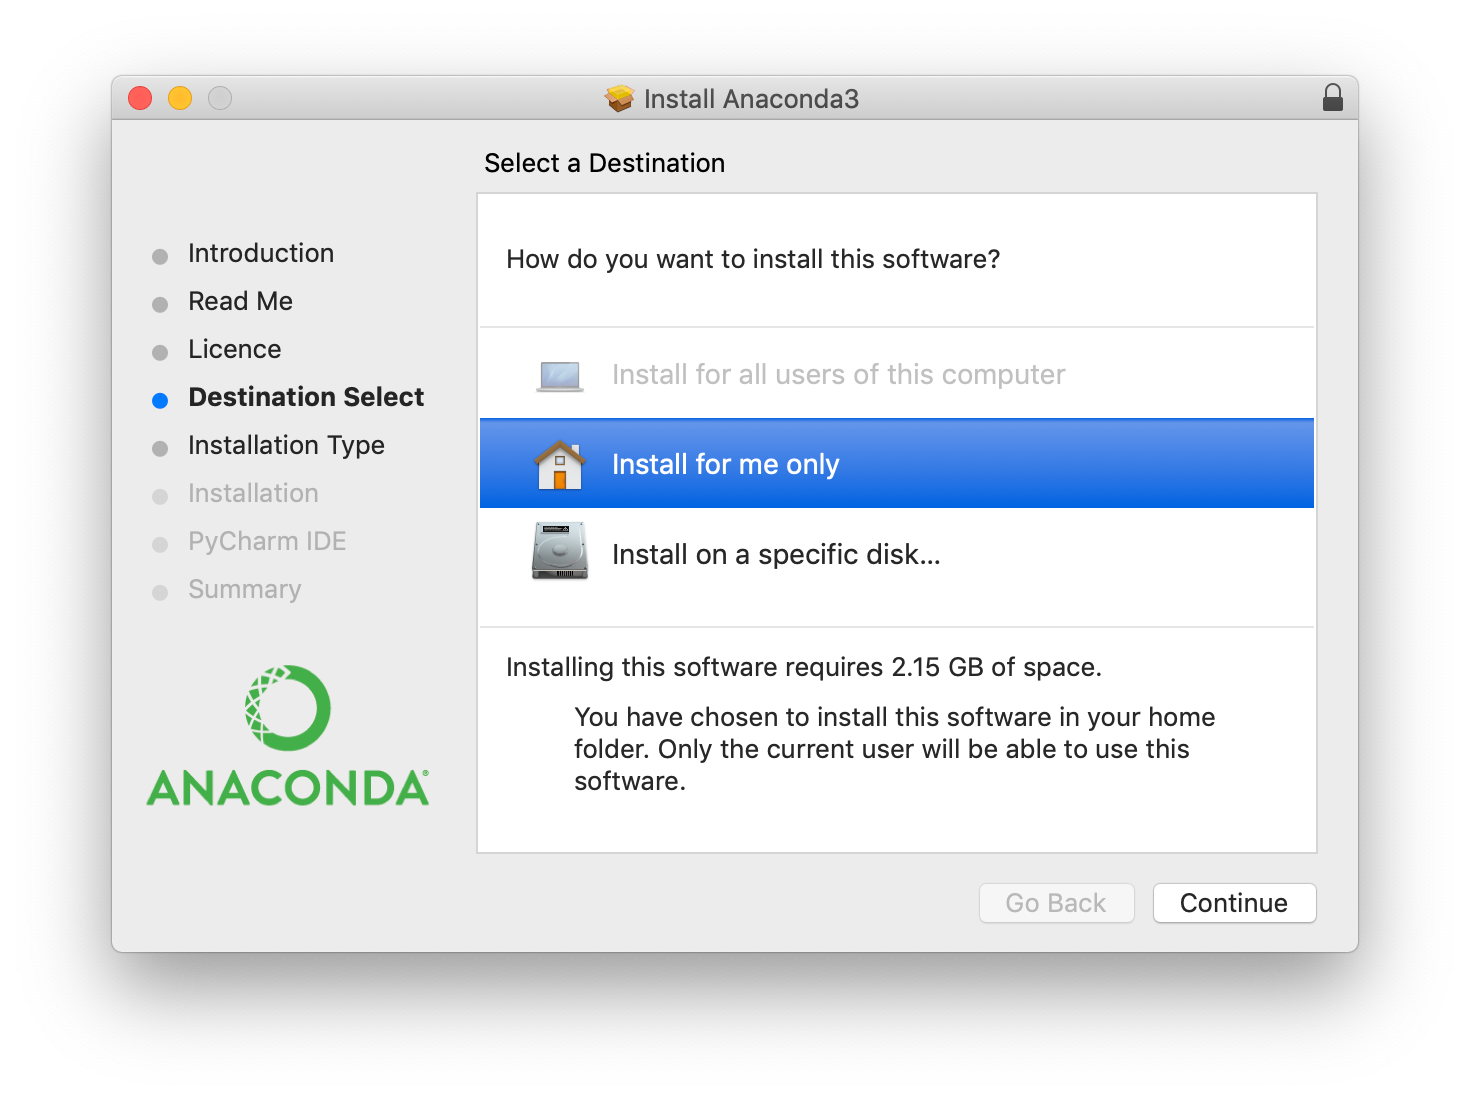
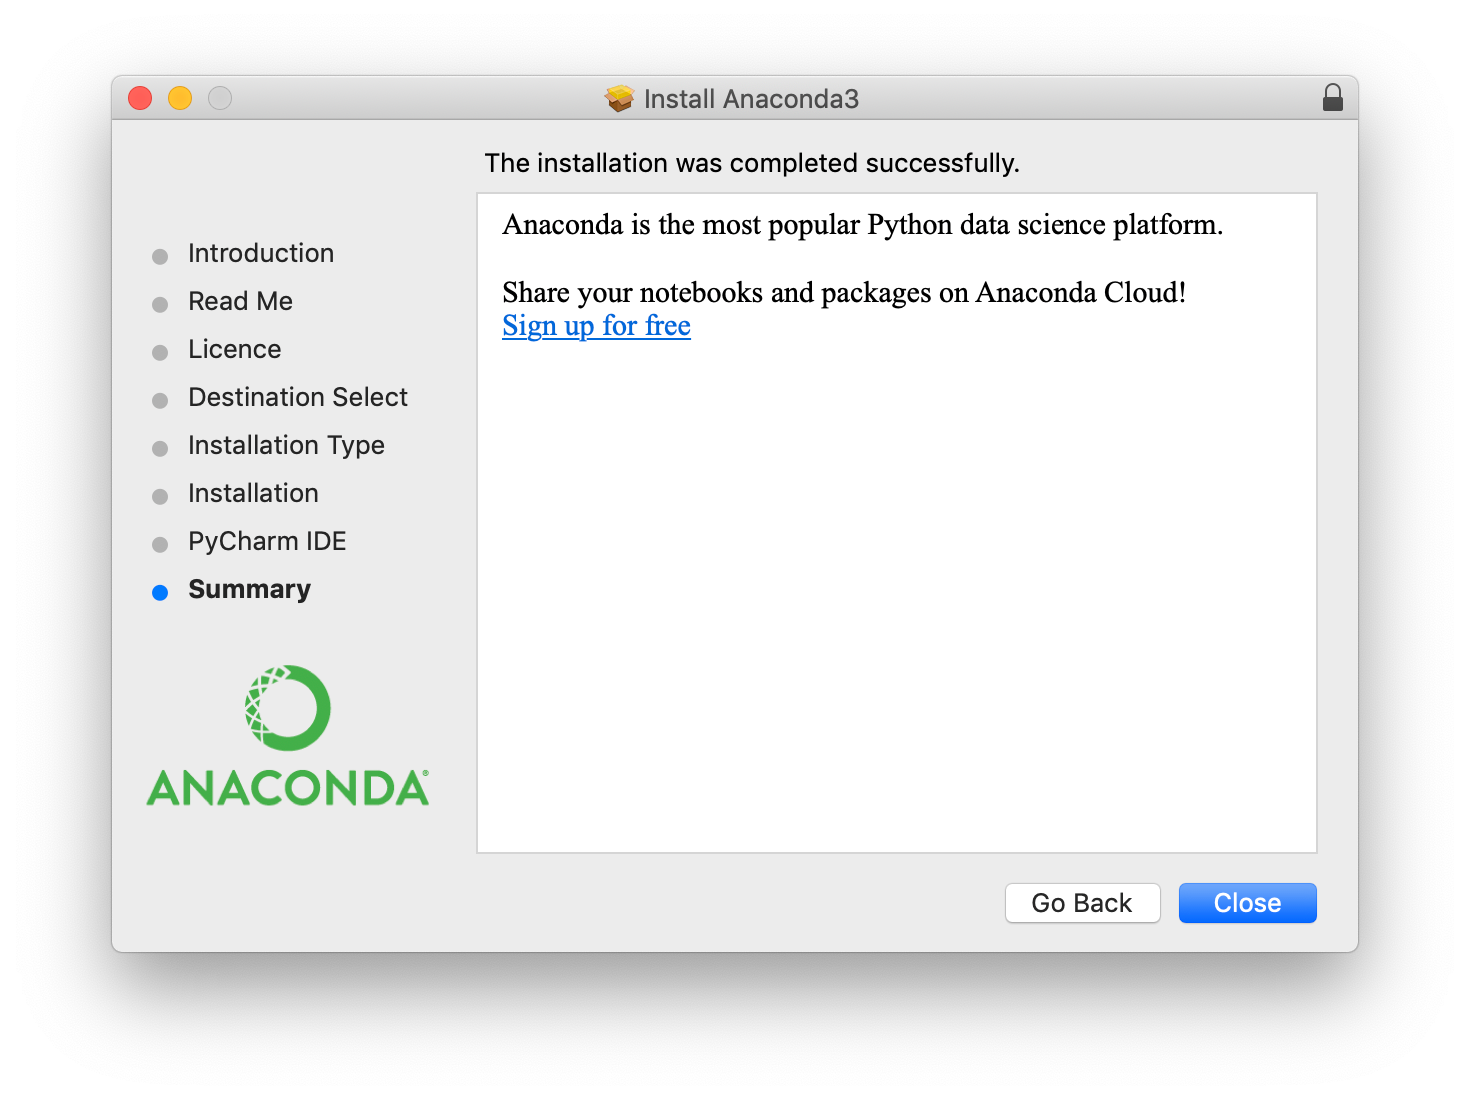
3. Once the download has completed, double click on the download file to go through the setup steps, leaving everything as default. This will install Anaconda on your computer. It may take a couple of minutes and you'll need up to 3 GB of space available.
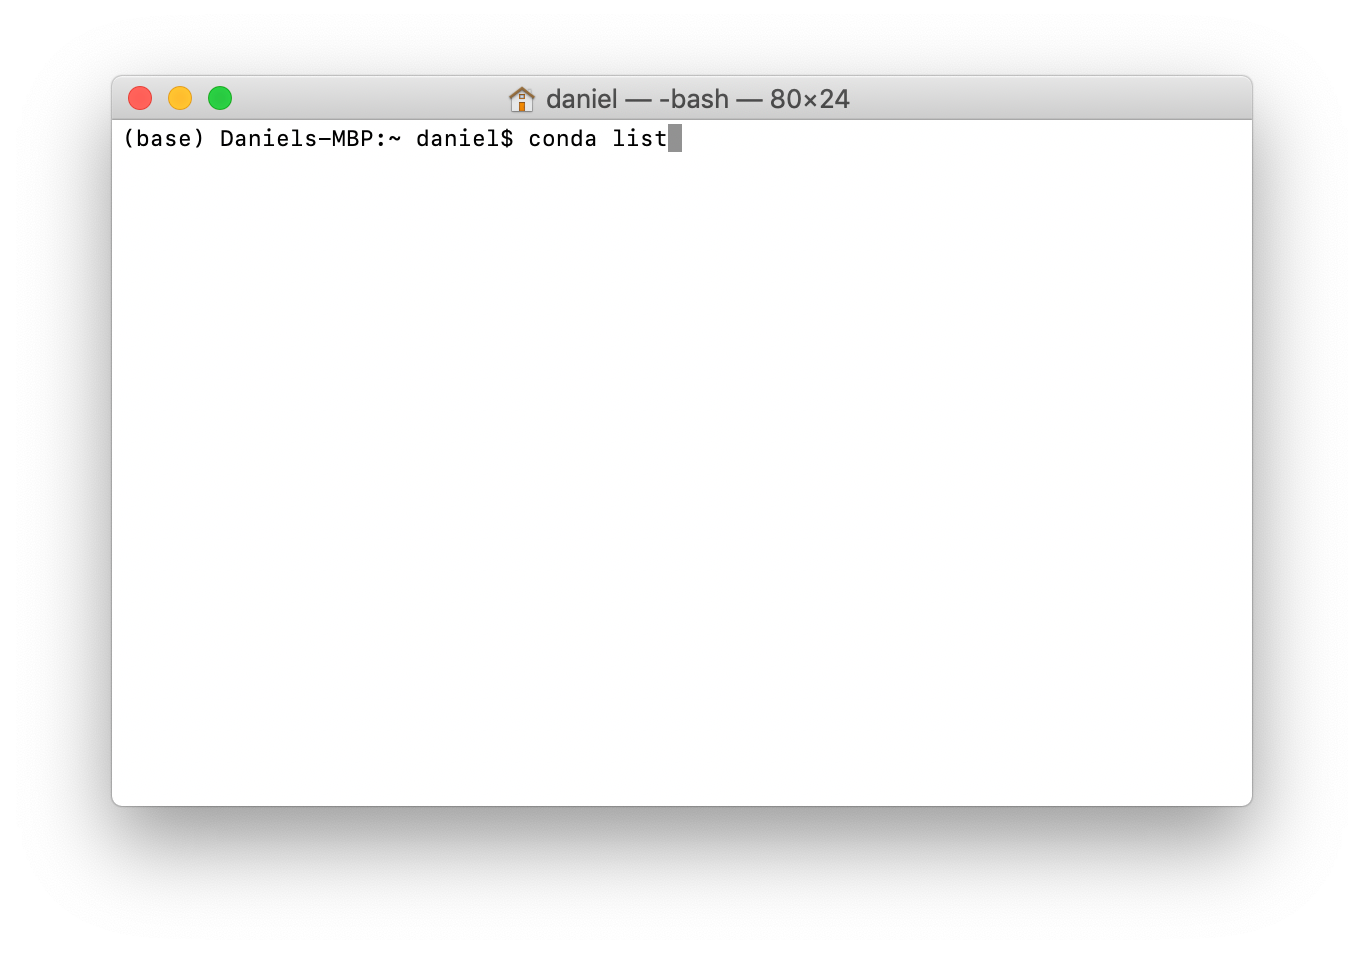
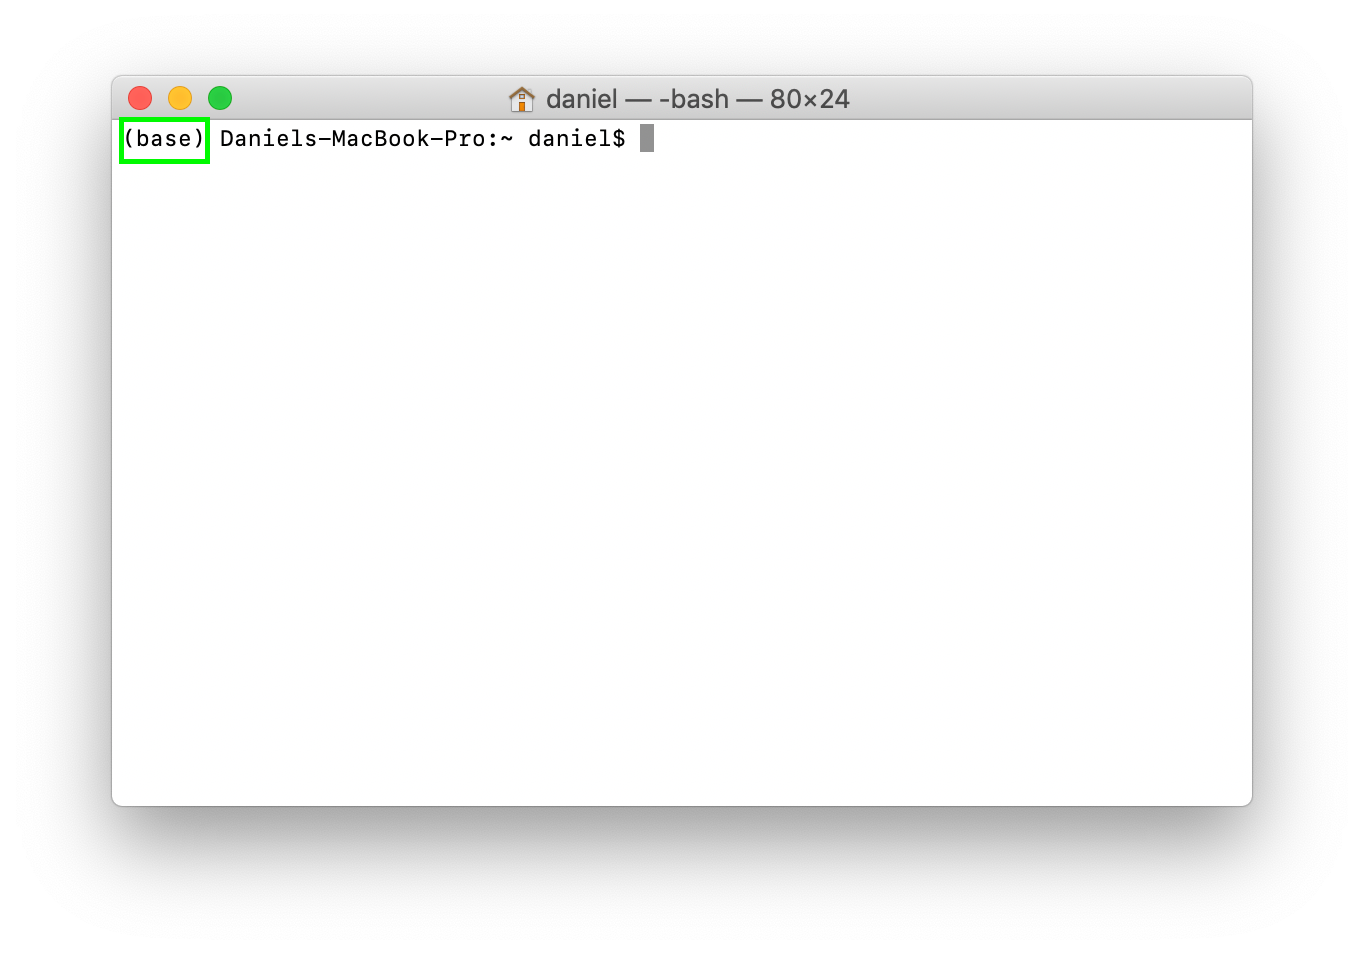
4. To check the installation, if you're on a Mac, open Terminal, if you're on another computer, open a command line. If it was successful, you'll see (base) appear next to your name. This means we're in the base environment, think of this as being on the floor of the hardware store.
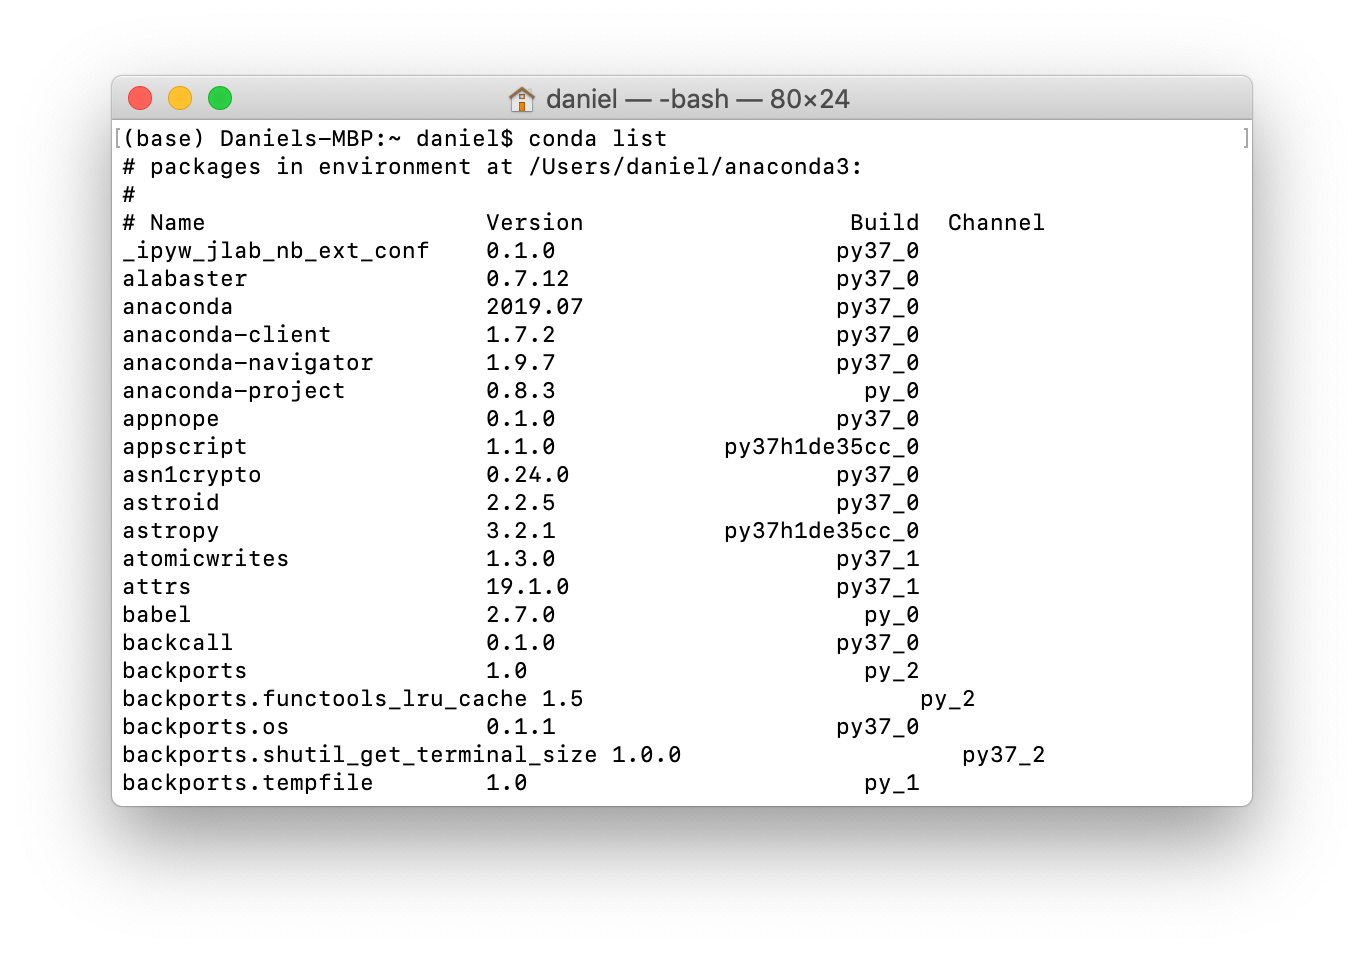
To see all the tools (packages) you just installed, type the code conda list and press enter. Don't worry, you won't break anything.
conda list and hitting enter will return all of the packages (data science tools) Anaconda installed on our computer. There should be a lot.What you should see is four columns. Name, version, build and channel.
Name is the package name. Remember, a package is a collection of code someone else has written.
Version is the version number of the package and build is the Python version the package is made for. For now, we won't worry about either of these but what you should know is some projects require specific version and build numbers.
Channel is the Anaconda channel the package came from, no channel means the default channel.
5. You can also check it by typing python on the command line and hitting enter. This will show you the version of Python you're running as well as whether or not Anaconda is there.
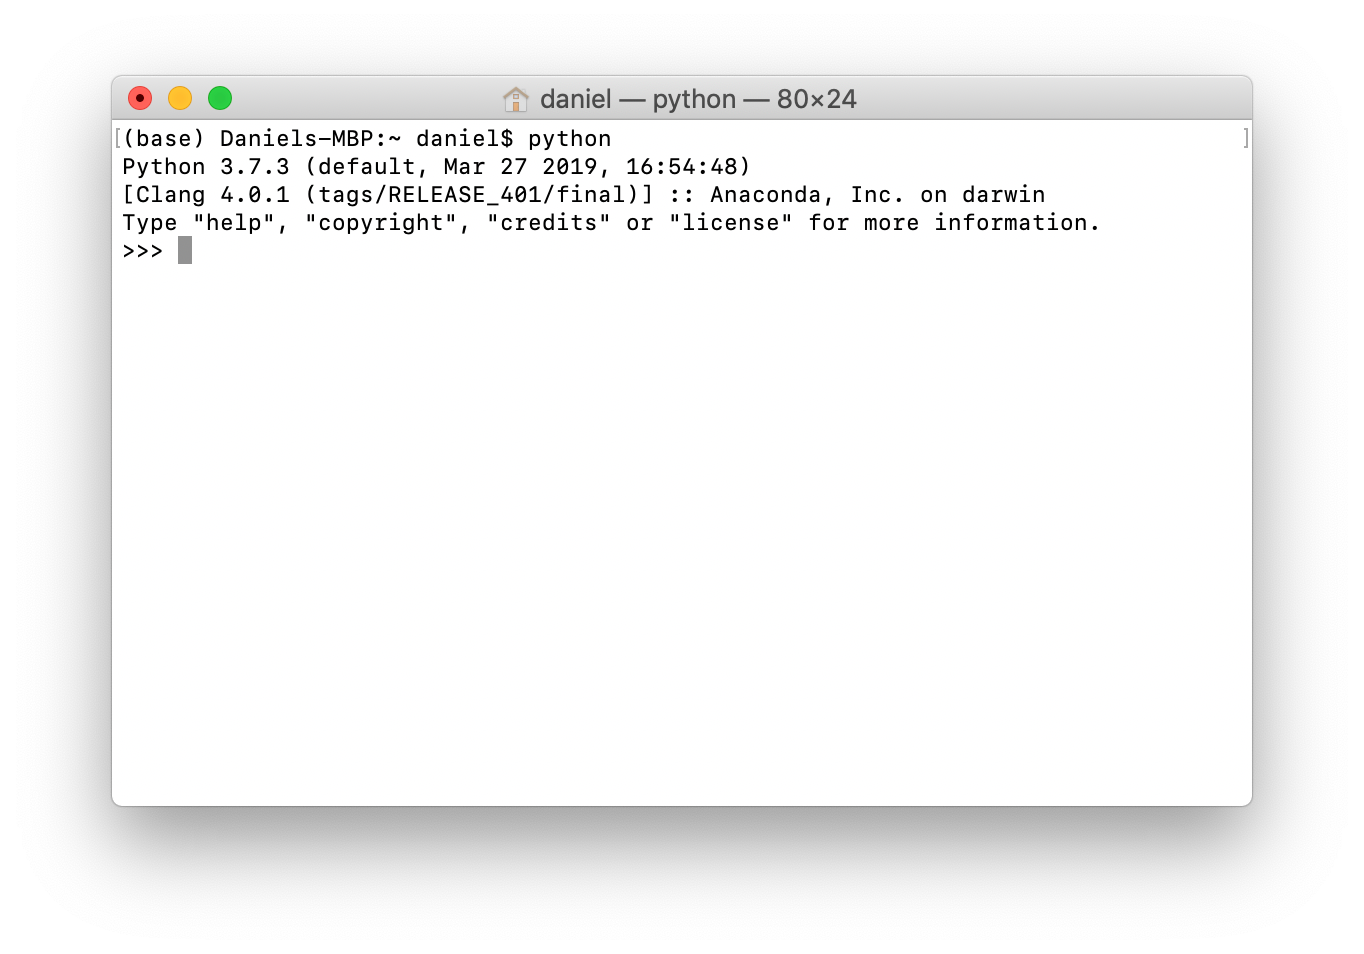
python on the command line, you should see the word Anaconda somewhere appear. This means you're using Anaconda's Python package.To get out of Python (the >>>), type exit() and hit enter.
6. Now remember, we just downloaded the entire hardware store of data science tools (packages) to our computer.
Right now, they're located in the default environment called (base), which was created automatically when we installed Anaconda. An environment is a collection of packages or data science tools. We'll see how to create our own environments later.
(base) is the default environment which gets installed automatically when installing Anaconda.You can see all of the environments on your machine by typing conda env list (env is short for environment).
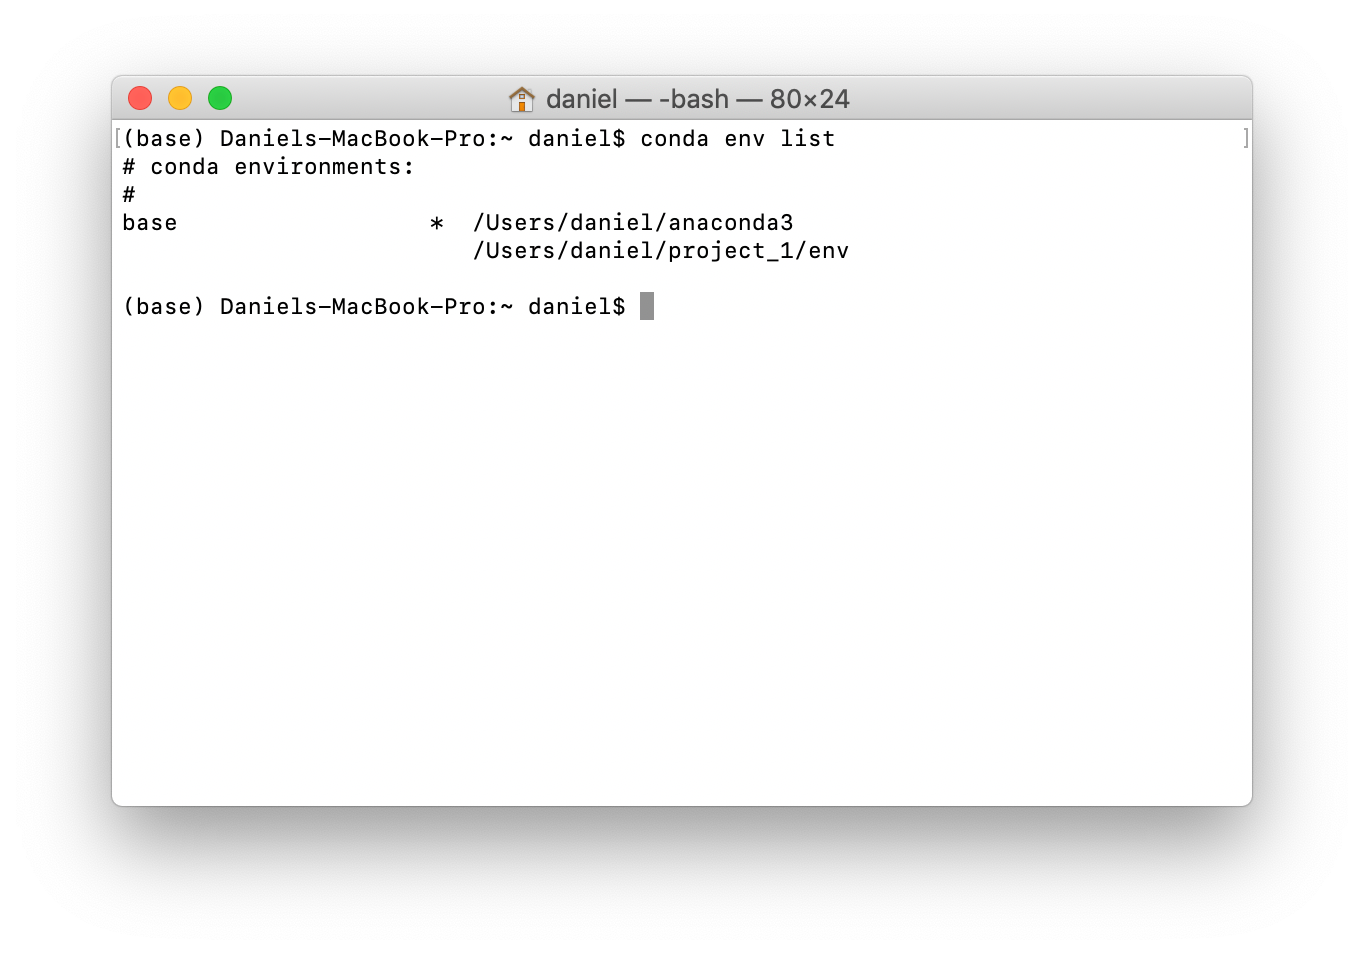
conda env list returns all of the environments you have setup on your computer. In my case, I have the environment (base), which I'm in as indicated by the * and I have env, which is in the project_1 folder, we'll look into this later.Okay, now we know we have Anaconda installed, let's say your goal is to get set up for our project to predict heart disease with machine learning.
After doing some research, you find the tools (packages) you'll need are:
- Jupyter Notebooks — for writing Python code, running experiments and communicating your work to others.
- pandas — for exploring and manipulating data.
- NumPy — for performing numerical operations on data.
- Matplotlib — for creating visualizations of your findings.
- scikit-learn — also called sklearn, for building and analysing machine learning models.
If you've never used these before, don't worry. What's important to know if you've followed the steps above and installed Anaconda, these packages have been installed too. Anaconda comes with many of the most popular and useful data science tools right out of the box. And the ones above are no exception.
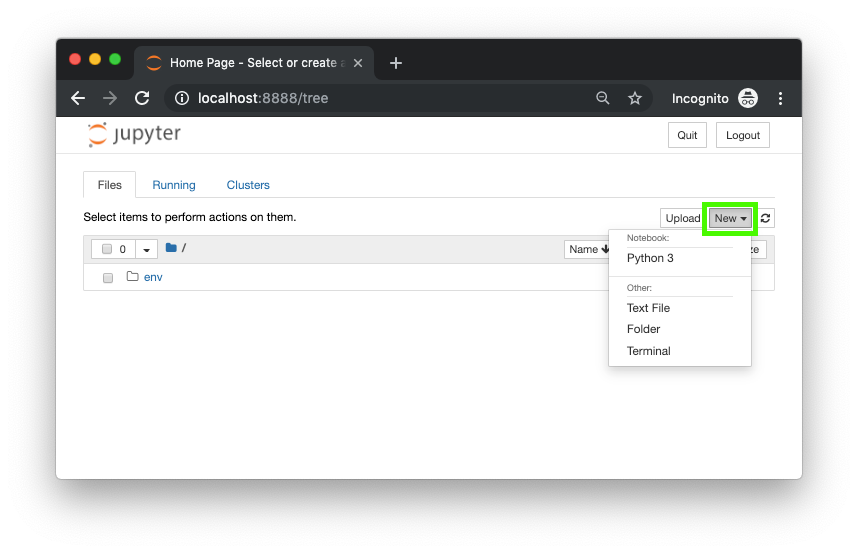
7. To really test things, we'll start a Jupyter Notebook and see if the packages above are available. To open a Jupyter Notebook, type jupyter notebook on your command line and press enter.
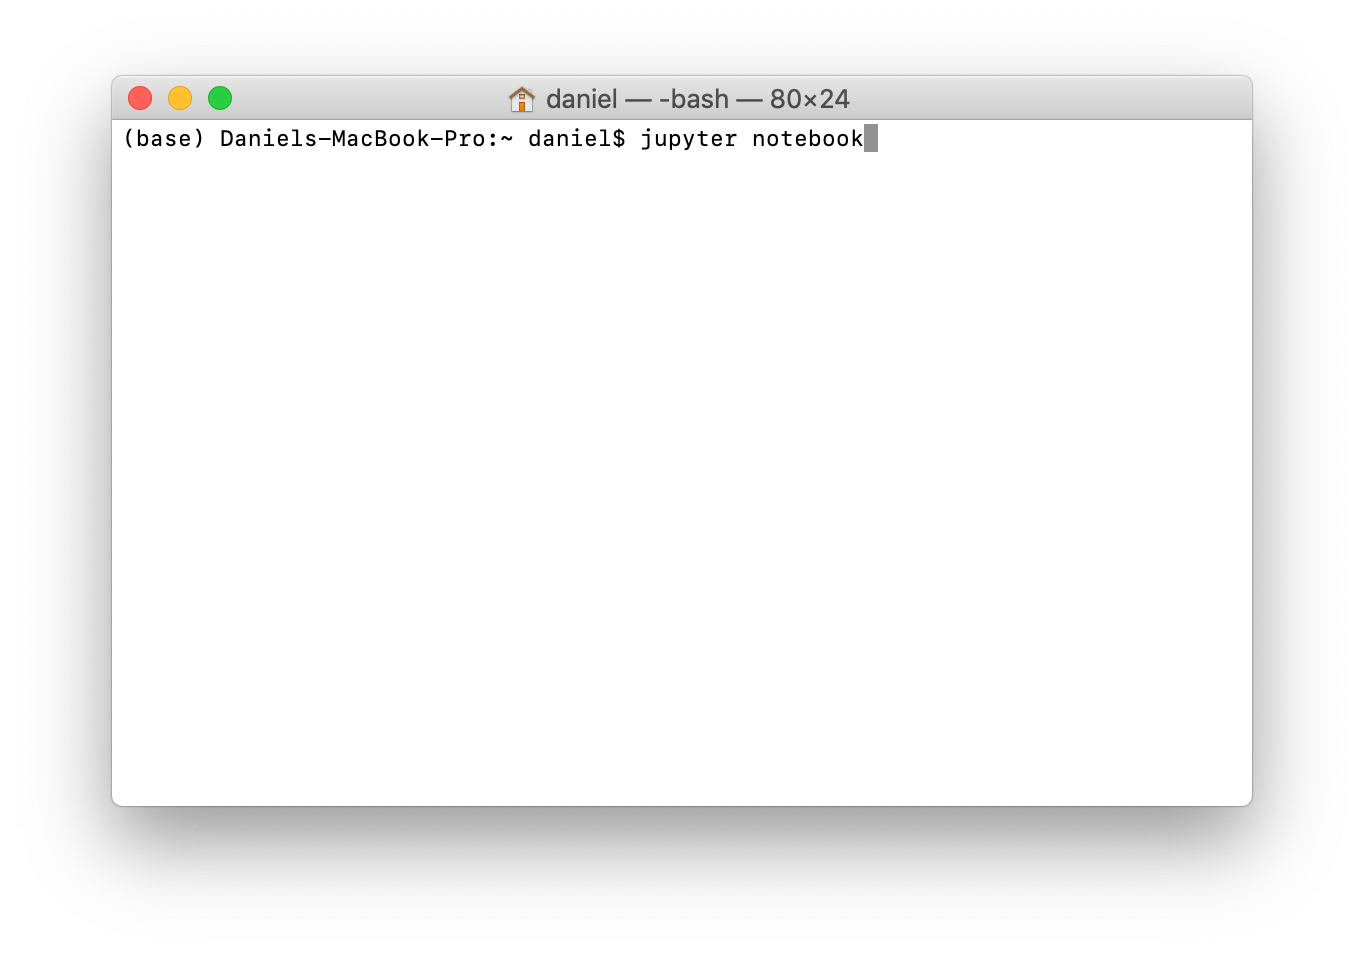
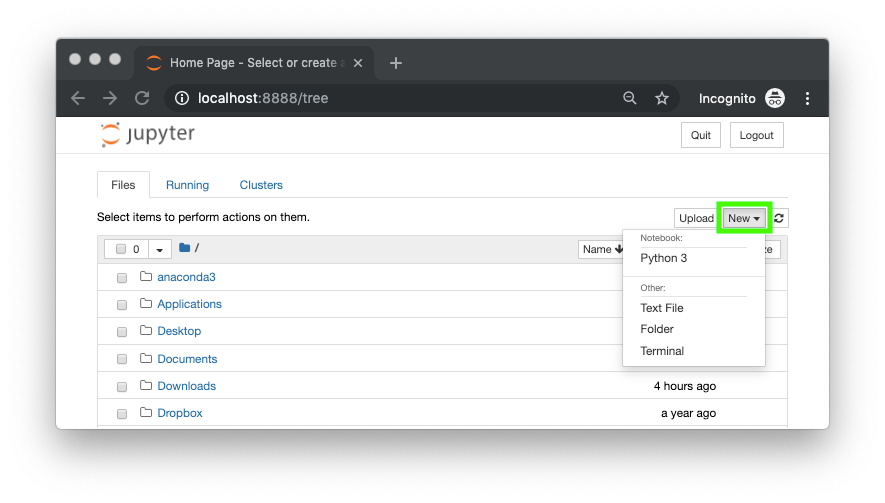
8. You should see the Jupyter Interface come up. It will contain all of the files you have in your current directory. Click on new in the top right corner and select Python 3, this will create a new Jupyter Notebook.
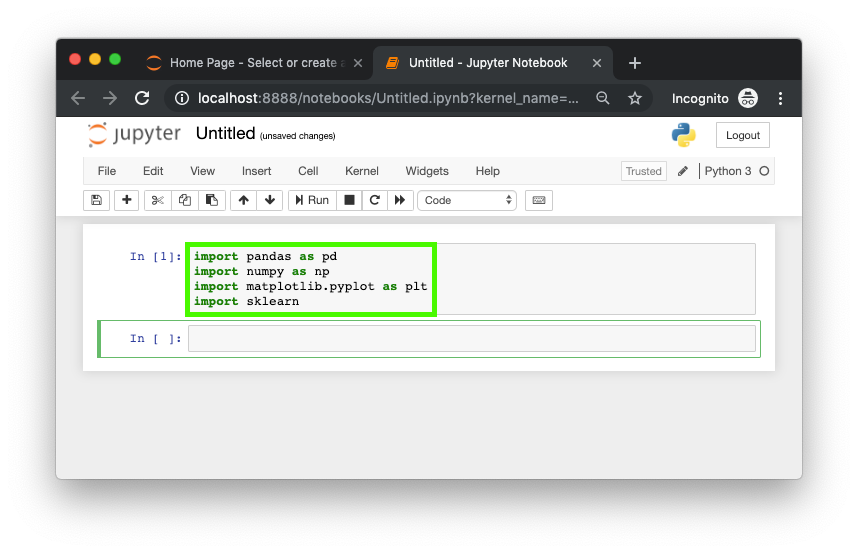
9. Now we'll try for the other tools we need. You can see if pandas is installed via typing the command import pandas as pd and hitting shift+enter (this is how code in a Jupyter cell is run). If there are no errors, thanks to Anaconda, we can now use pandas for data manipulation.
10. Do the same for NumPy, Matplotlib and scikit-learn packages using the following:
- NumPy —
import numpy as np - Matplotlib —
import matplotlib.pyplot as plt - scikit-learn —
import sklearn
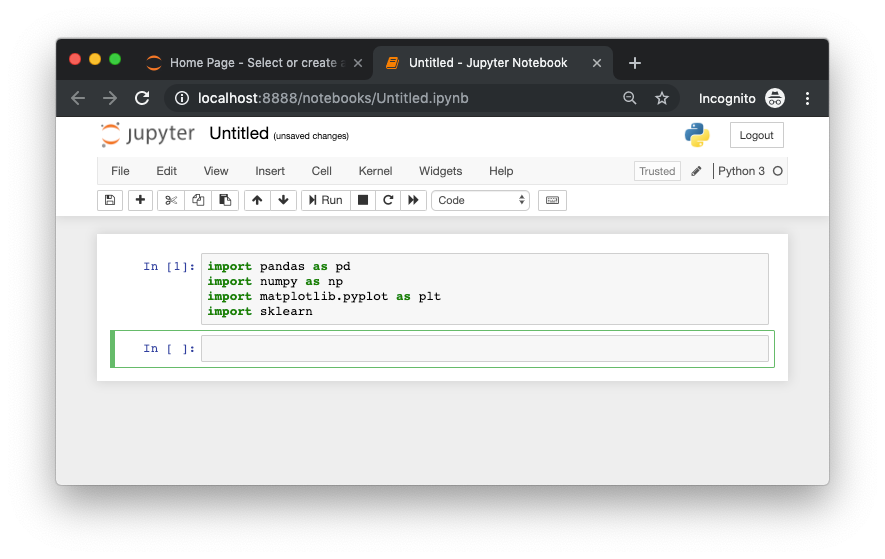
If these all worked, you've now got all the tools you need to start working on your heart disease problem. All you need now is the data.
Summary of Anaconda
This may seem like a lot of steps to get started but they will form the foundation of what you will need going forward as a data scientist or machine learning engineer.
- Why — We use Anaconda to access all of the code other people have written before us so we don't have to rewrite it ourselves.
- What — Anaconda provides a hardware store worth of data science tools such as, Jupyter Notebooks, pandas, NumPy and more.
- How — We downloaded Anaconda from the internet onto our computer and went through an example showing how to get started with the fundamental tools.
The steps we took:
- Downloaded Anaconda from the internet.
- Installed Anaconda to our computer.
- Tested in the install in terminal using
conda listwhich showed us all the packages (data science tools) we installed. - Loaded a Jupyter Notebook (one of the tools).
- Performed a final check by importing pandas, NumPy, Matplotlib and sklearn to the Jupyter Notebook.
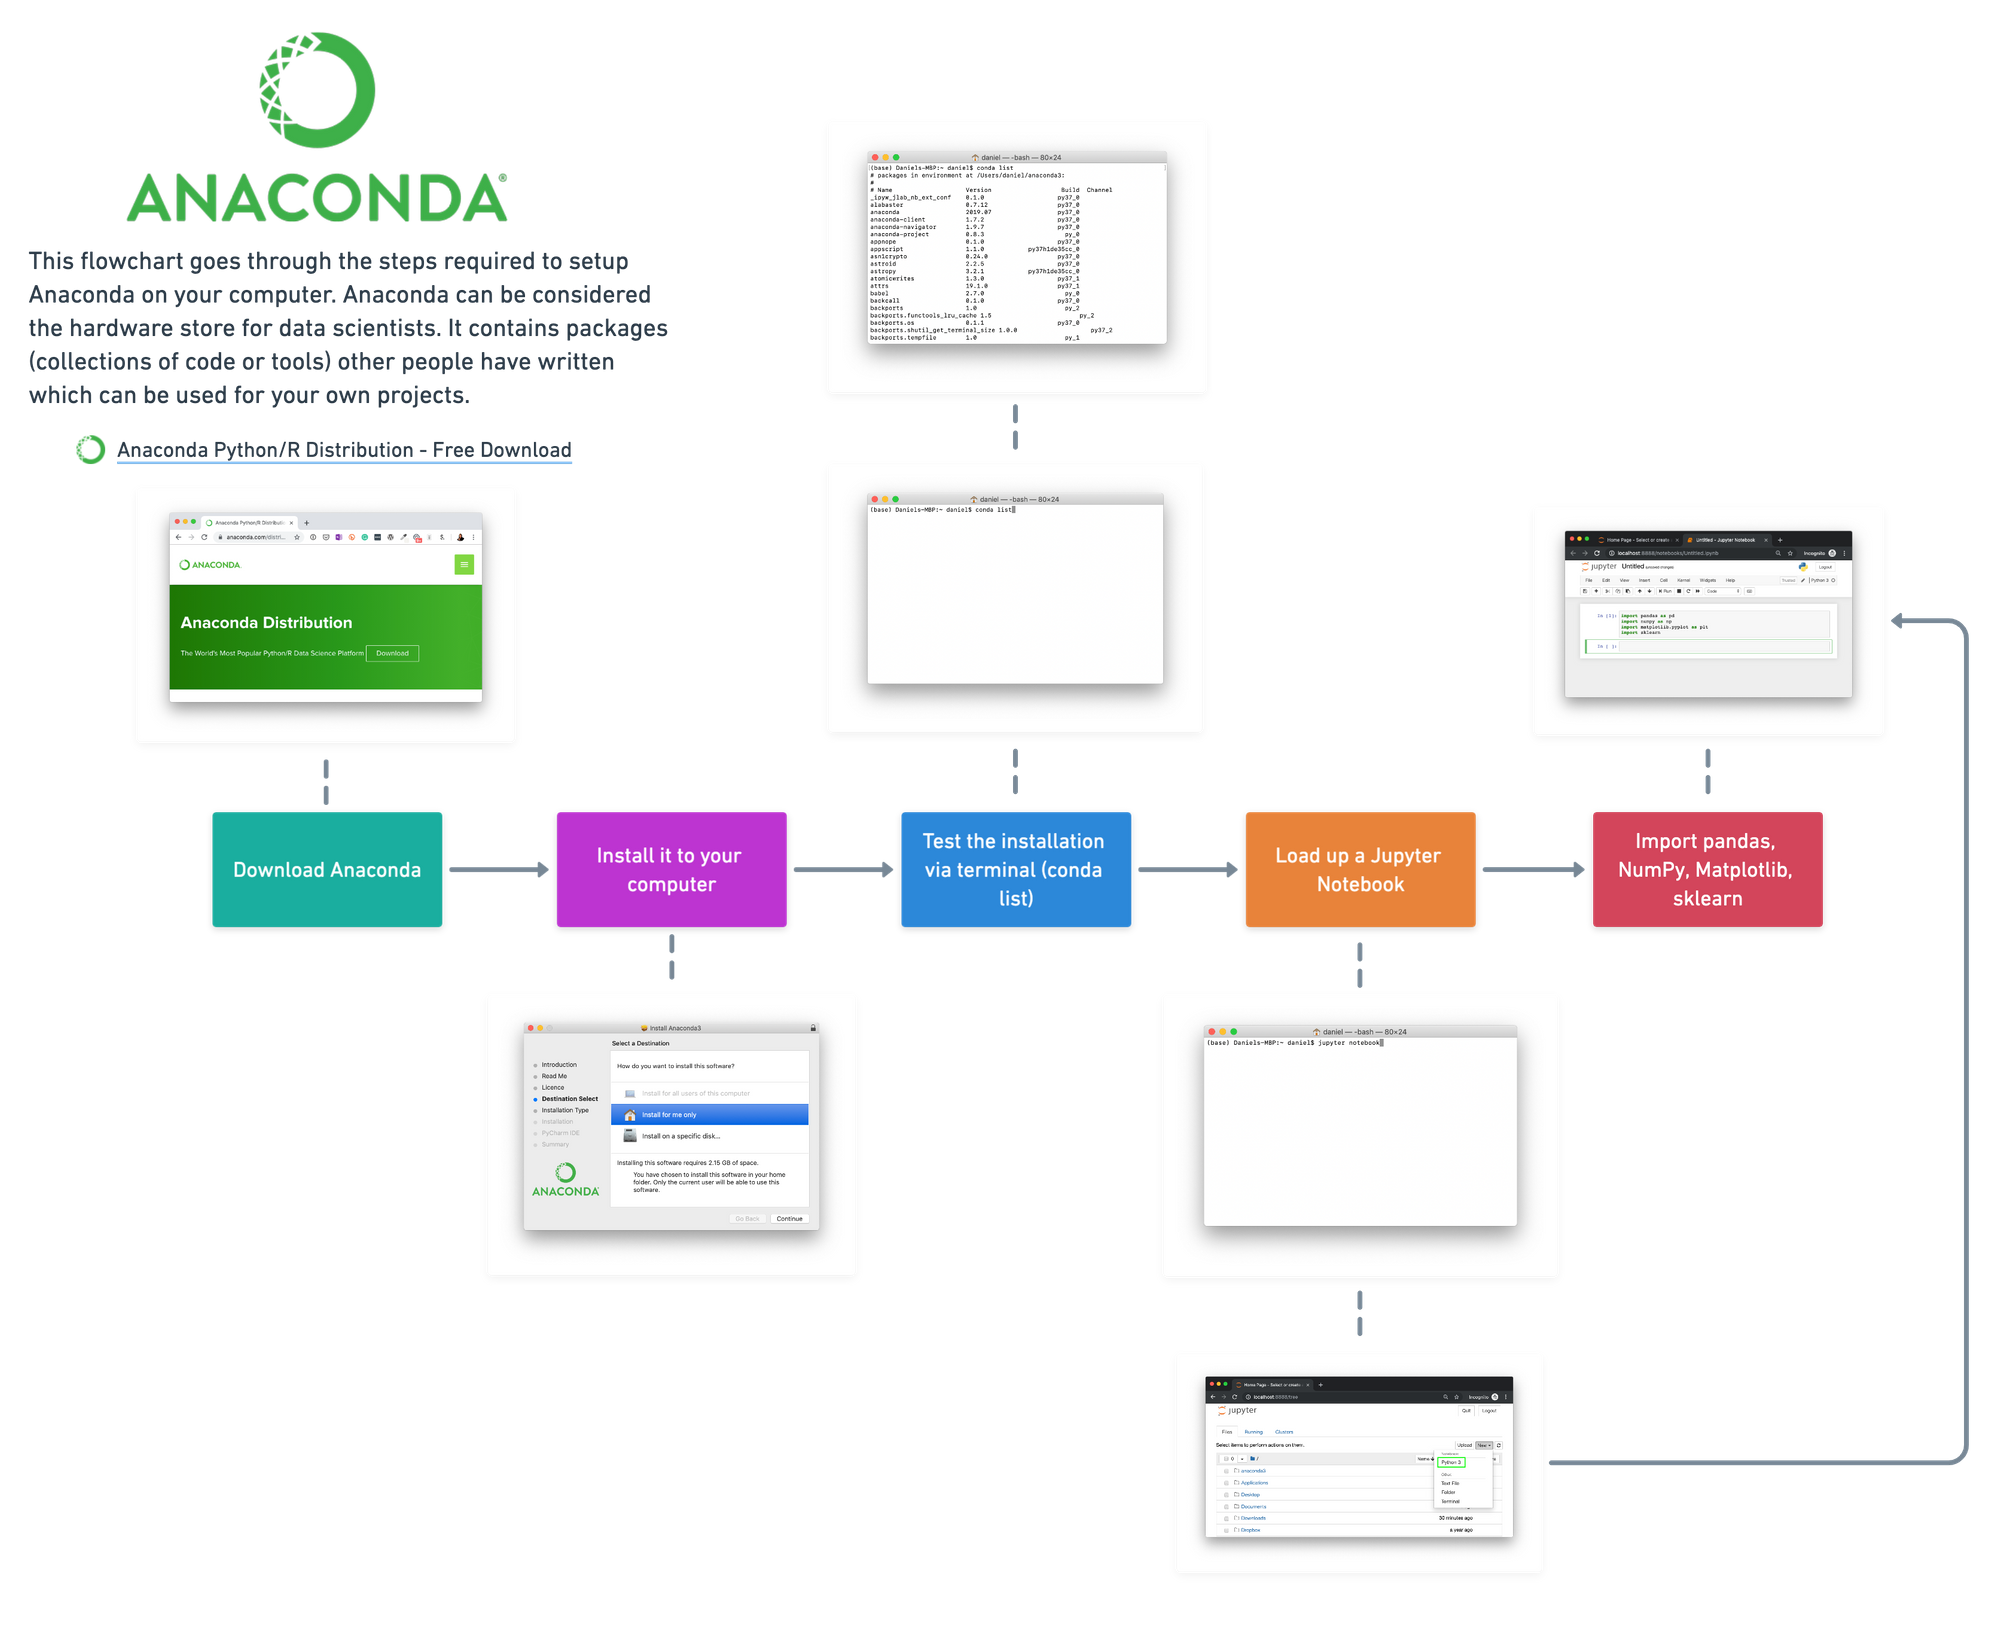
Creating a custom environment using Miniconda and Conda
Using Anaconda, the whole hardware store of data science tools is great to get started. But for longer-term projects, you'll probably want to create your own unique environments (workbenches) which only have the tools you need for the project, rather than everything.
There are several ways you can create a custom environment with Conda. For this example, we'll download Miniconda which only contains the bare minimum of data science tools to begin with. Then we'll go through creating a a custom environment within a project folder (folders are also called directories).
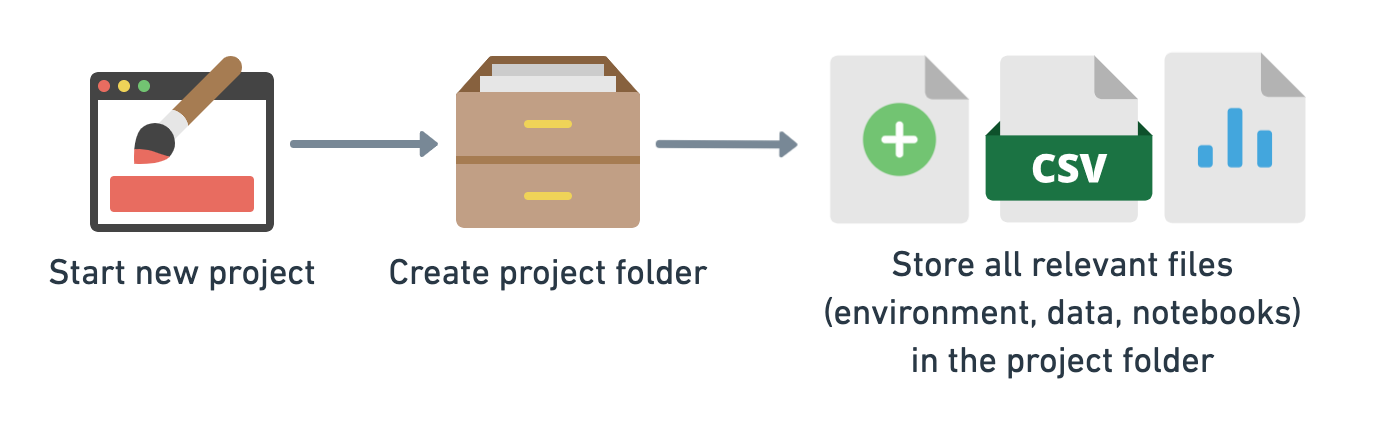
Why this way?
It's a good idea at the start of every project to create a new project directory. Then within this directory, keep all of the relevant files for that project there, such as, the data, the code and the tools you use.
In the next steps, we'll setup a new project folder called project_1. And within this directory, we'll create another directory called env (short for environment) which contains all the tools we need.
Then, within the env directory, we'll set up an environment to work on the same project as above, predicting heart disease. So we'll need Jupyter Notebooks, pandas, NumPy, Matplotlib and scikit-learn.
Remember, doing it like this allows for an easy way to share your projects with others in the future.
Note: If you already have Anaconda, you don't need Miniconda so you can skip step 1 and go straight to step 2. Since Anaconda and Miniconda both come with Conda, all of the steps from step 2 onwards in this section are compatible with the previous section.
- To start, we download Miniconda from the Conda documentation website. Choose the relevant one for you. Since I'm using a Mac, I've chosen the Python 3.7, 64-bit pkg version.
Once it's downloaded, go through the setup steps. Because Miniconda doesn't come with everything Anaconda does, it takes up about 10x less disk space (2.15 GB versus 200 MB).
When the setup completes, you can check where it's installed using which conda on the command line.
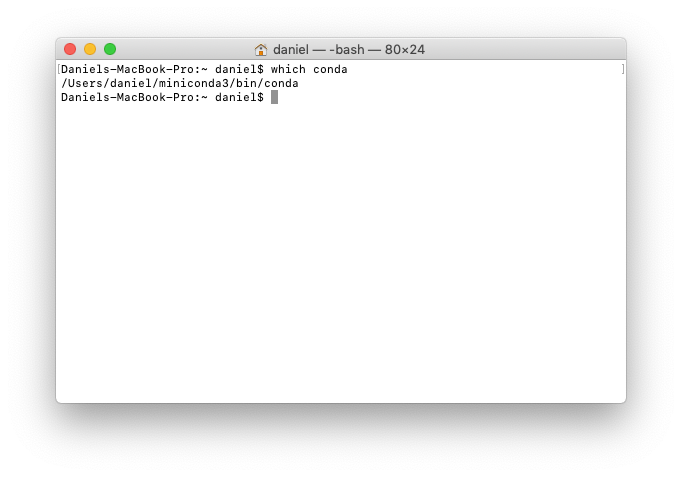
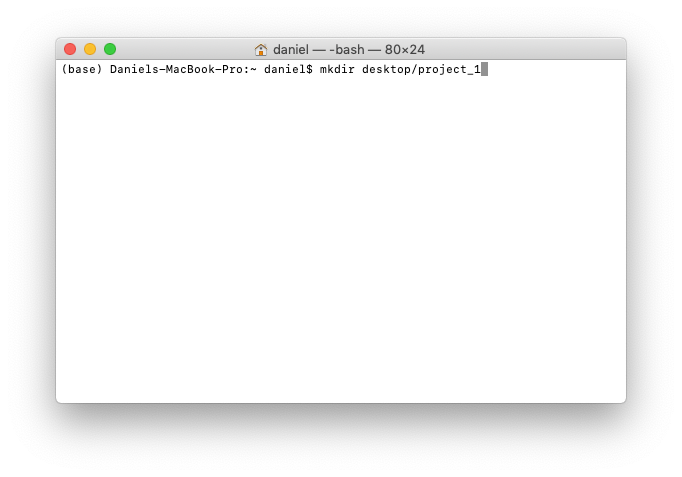
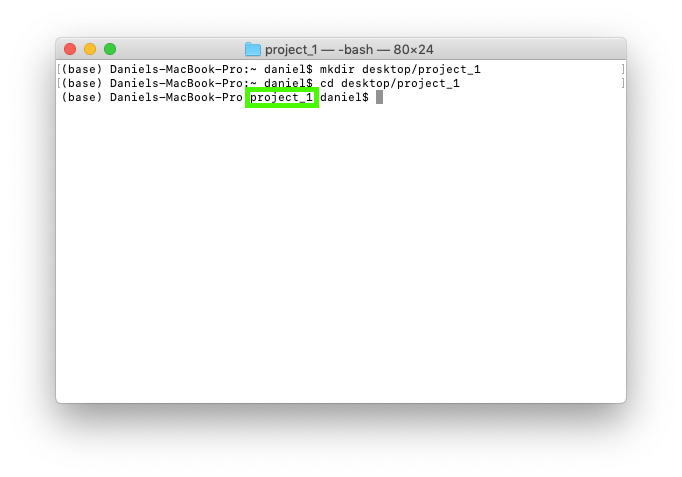
which conda on the command line. In my case, it's stored at /Users/daniel/miniconda3/bin/conda.2. Create a project folder on the desktop called project_1. In practice, we use this project folder for all of our work so it can be easily shared with others.
To create a folder called project_1 on the desktop, we can use the command mkdir desktop/project_1. mkdir stands for make directory and desktop/project_1 means make project_1 on the desktop.
3. We'll change into the newly created project folder using cd desktop/project_1. cd stands for change directory.
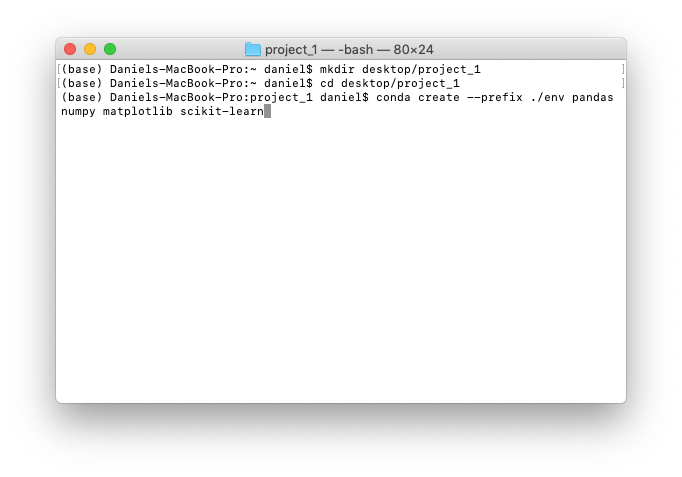
4. Once you're in the project folder, the next step is to create an environment in it. Remember, the environment contains all of the foundation code we'll need for our project. So if we wanted to reproduce our work later or share it with someone else, we can be sure our future selves and others have the some foundations to work off as we did.
We'll create another folder called env, inside this folder will be all of the relevant environment files. To do this we use:
$ conda create --prefix ./env pandas numpy matplotlib scikit-learn
The --prefix tag along with the . before /env means the env folder will be created in the current working directory. Which in our case, is Users/daniel/desktop/project_1/.
env inside the current folder and install the pandas, NumPy, Matplotlib and scikit-learn packages.' New Conda environments come with a few tools to get started but most of the time, you'll have to install what you're after.After running the line of code above, you'll be asked whether you want to proceed. Press y.
When the code completes, there will now be a folder called env in the project_1 folder. You can see a list of all the files in a directory using ls which is short for list.
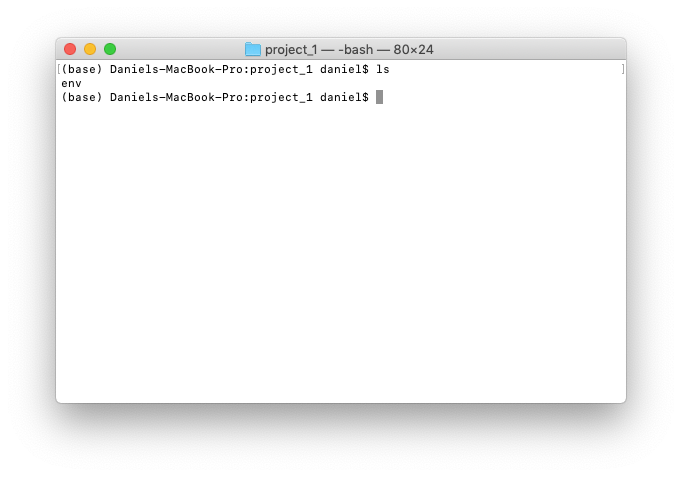
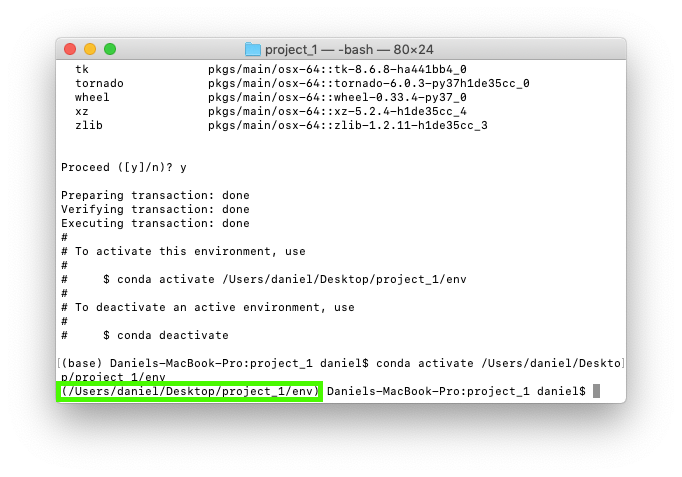
project_1 folder and an env folder. The project_1 folder will contain all of our project files such as data, Jupyter Notebooks and anything else we need. The env folder will contain all of the data science and machine learning tools we'll be using.5. Once the environment is setup, the output in the terminal window let's us know how we can activate our new environment. In my case, it's conda activate Users/daniel/desktop/project_1. You'll probably want to write this command down somewhere.
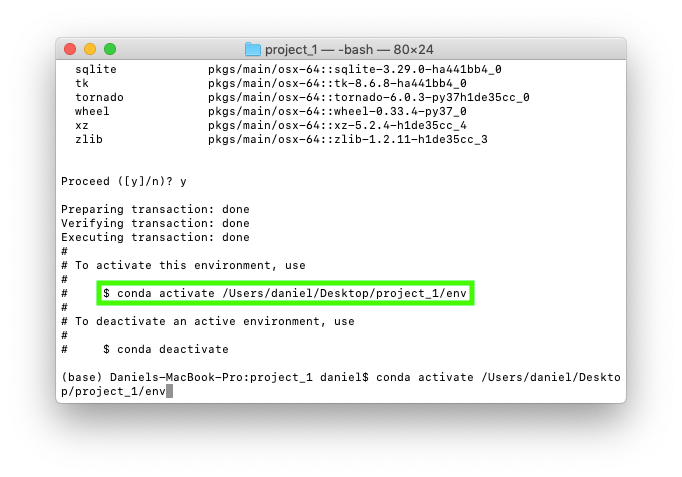
conda activate [ENV] where [ENV] is the environment you want to activate.This is because I've created the env folder on my desktop in the project_1 folder.
Running the line of code above activates our new environment. Activating the new environment changes (base) to (Users/daniel/desktop/project_1) because this is where the new environment lives.
6. Now our environment is activated, we should have access to the packages we installed above. Let's see if we can start up a Jupyter Notebook like we did in the previous section. To do so, we run the command jupyter notebook on the command line with our new environment activated.
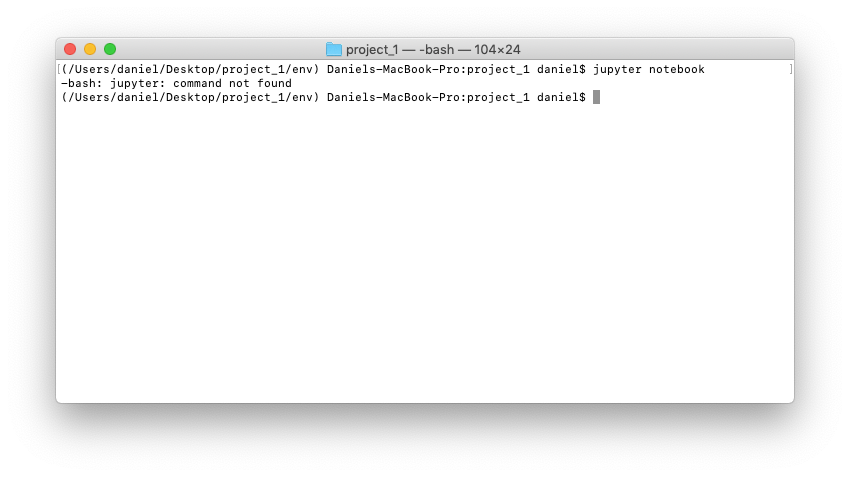
env folder, we forgot to install the jupyter package. This means we can't run the jupyter notebook command. Not to worry, Conda makes it easy to install new packages with conda install.7. Oops... We forgot to install Jupyter. This is a common mistake when setting up new environments for the first time. But there's ways around it. Such as setting up environments from templates. We'll see how to do that in the extension section.
To install the Jupyter package and use Jupyter Notebooks, you can use conda install jupyter.
This is similar to what we ran before to setup the environment, except now we're focused on one package, jupyter. It's like saying, 'Hey conda install the jupyter package to the current environment'.
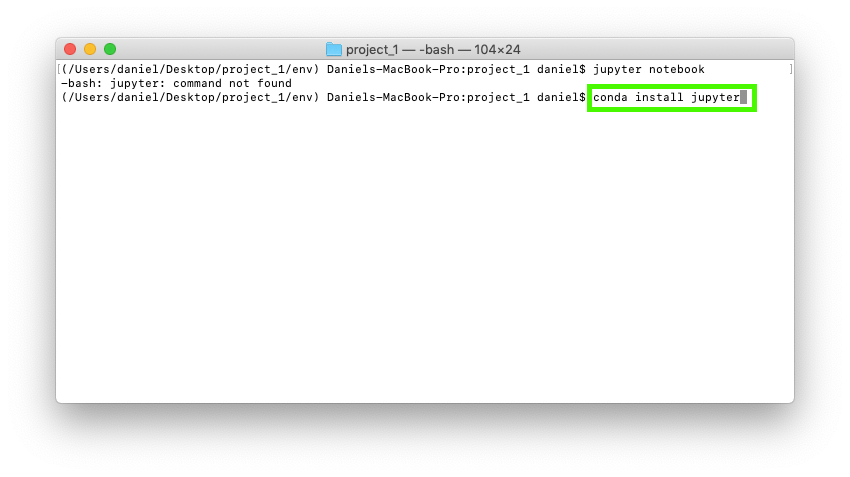
conda install [PACKAGE] where [PACKAGE] is your desired package.Running this command will again, ask you if you want to proceed. Press y. Conda will then install the jupyter package to your activated environment. In our case, it's the env folder in project_1.
8. Now we have Jupyter installed, let's try open a notebook again. We can do so using jupyter notebook.
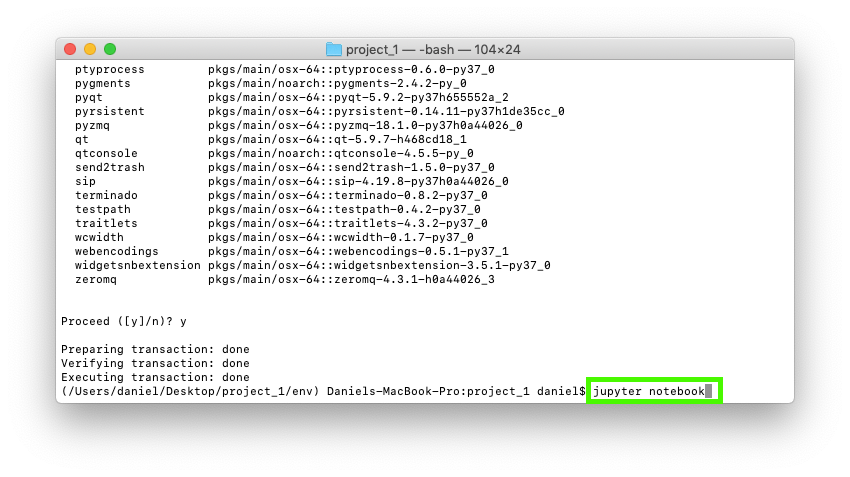
jupyter package into our environment, so now we'll able to run the jupyter notebook command.9. Beautiful, the Jupyter Interface loads up, we can create a new notebook by clicking new and selecting Python 3.
env folder you made. And since we're in the project_1 folder, any new files you create with the New button will be stored within the project_1 folder.Then to test the installation of our other tools, pandas, NumPy, Matploblib and scikit-learn, we can enter the following lines of code in the first cell and then press shift+enter.
import pandas as pd
import numpy as np
import matplotlib.pyplot as plt
import sklearn
If this cell runs without any errors, we've now got an environment setup for our new project.
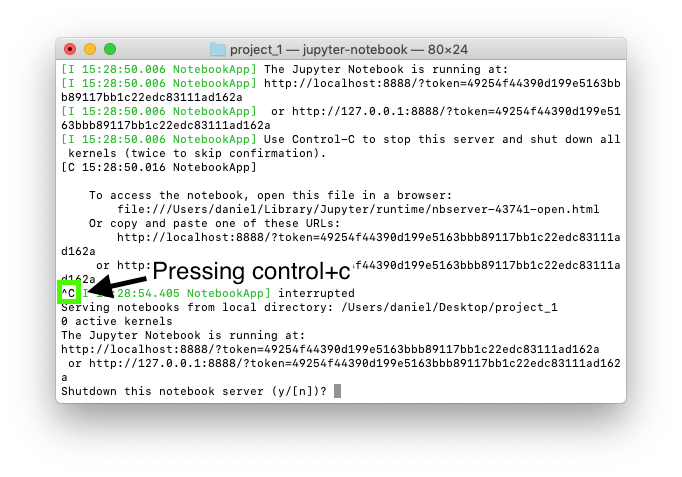
10. To stop your Jupyter Notebook running, press control+c in your terminal window where it's running. When it asks if you want to proceed, press y.
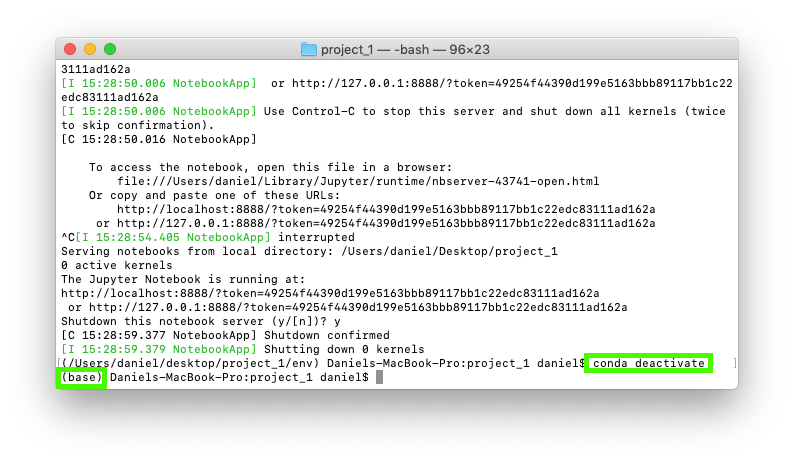
11. To exit your environment you can use conda deactivate. This will take you back to the (base) environment.
12. To get back into your environment run the conda activate [ENV_NAME] command you wrote down earlier where [ENV_NAME] is your environment. Then to get access back to Jupyter Notebooks, run the jupyter notebook command. This will load up the Jupyter interface.
In my case, the code looks like the following:
(base) Daniels-MBP:~ daniel$ conda activate \ /Users/daniel/Desktop/project_1/env
(/Users/daniel/Desktop/project_1/env) Daniels-MBP:~ daniel$ jupyter notebook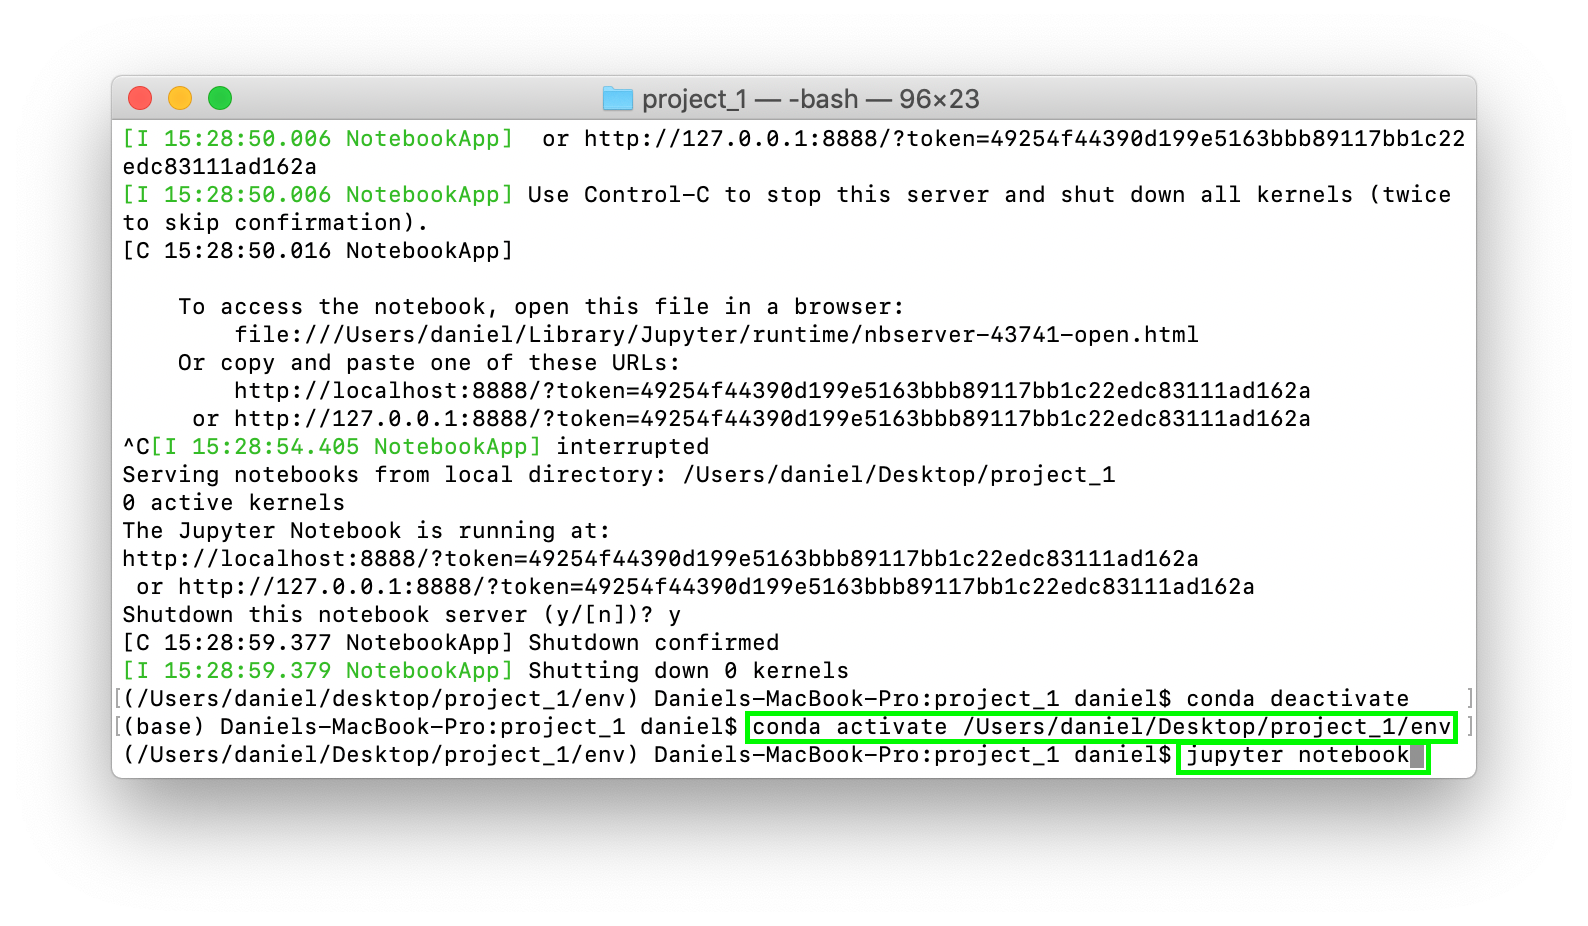
Summary of Miniconda
This seems like a lot of steps and it is. But these skills are important to know. Ensuring your have a good foundational environment to work on will help save a lot of time in the future.
Imagine working in your toolshed but everything was misplaced. You might know where things are but as soon as someone else comes to help, they spend hours trying to find the right tool. Instead, now they've got an environment to work with.
- Why — We use Miniconda when we don't need everything Anaconda offer and to create our own custom environments we can share with others.
- What — Minconda is smaller version of Anaconda and Conda is a fully customisable package manager we can use to create and manage environments.
- How — We downloaded Miniconda from the internet onto our computer, which includes Conda. We then used Conda to create our own custom environment for
project_1.
The steps we took setting up a custom Conda environment (these steps will also work for Anaconda):
- Downloaded Miniconda from the internet.
- Installed Miniconda to our computer.
- Create a project folder called
project_1on the desktop usingmkdir project_1then changed into it usingcd project_1. - Used
conda create --prefix ./env pandas numpy matplotlib scikit-learnto create an environment folder calledenvcontaining pandas, NumPy, Matplotlib and scikit-learn inside ourproject_1folder. - Activated our environment using
conda activate /Users/daniel/Desktop/project_1/env - Tried to load a Jupyter Notebook using
jupyter notebookbut it didn't work because we didn't have the package. - Installed Jupyter using
conda install jupyter. - Started a Jupyter Notebook using
jupyter notebookand performed a final check by importing pandas, NumPy, Matplotlib and sklearn to the Jupyter Notebook.
Summary of Conda
It's important to remember, both Anaconda and Miniconda come with Conda. So not matter which one you download, you can perform the same steps with each.
Where Anaconda is the hardware store of data science tools and Miniconda is the workbench (software distributions), Conda is the assistant (package manager) who helps you get new tools and customise your hardware store or workbench.
The following are some helpful Conda commands you'll want to remember.
| Function | Command |
|---|---|
| Get a list of all your environments | conda env list |
| Get a list of all the packages installed in your current active environment | conda list |
| Create an environment called [ENV_NAME] | conda create --name [ENV_NAME] |
| Create an environment called [ENV_NAME] and install pandas and numpy | conda create --name [ENV_NAME] pandas numpy |
| Activate an environment called [ENV_NAME] | conda activate [ENV_NAME] |
| Create an environment folder called env in the current working directory (e.g. /Users/Daniel/project_1/) and install pandas and numpy | conda create --prefix ./env pandas numpy |
| Activate an environment stored in a folder called env, which is located within /Users/Daniel/project_1/ | conda activate /Users/daniel/project_1/env |
| Deactivate an environment | conda deactivate |
| Export your current active environment to a YAML file called environment (see why below) | conda env export > environment.yaml |
| Export an environment stored at /Users/Daniel/project_1/env as a YAML file called environment (see why below) | conda env export --prefix /Users/Daniel/project_1/env > environment.yaml |
| Create an environment from a YAML file called environment (see why below) | conda env create --file environment.yaml |
| Install a new package, [PACKAGE_NAME] in a target environment | conda install [PACKAGE_NAME] (while the target environment is active) |
| Delete an environment called [ENV_NAME] | conda env remove --name [ENV_NAME] |
| Delete an environment stored at /Users/Daniel/project_1/env | conda remove --prefix /Users/Daniel/project_1/env --all |
Extra: Exporting a Conda environment as a YAML file
If you've done all of the above, the next place you'll want to go is how to share your environments as a YAML file. A YAML file is a common file type which can be shared easily and used easily.
To export the environment we created earlier at /Users/daniel/Desktop/project_1/env as a YAML file called environment.yaml we can use the command:
conda env export --prefix /Users/daniel/Desktop/project_1/env > environment.yaml
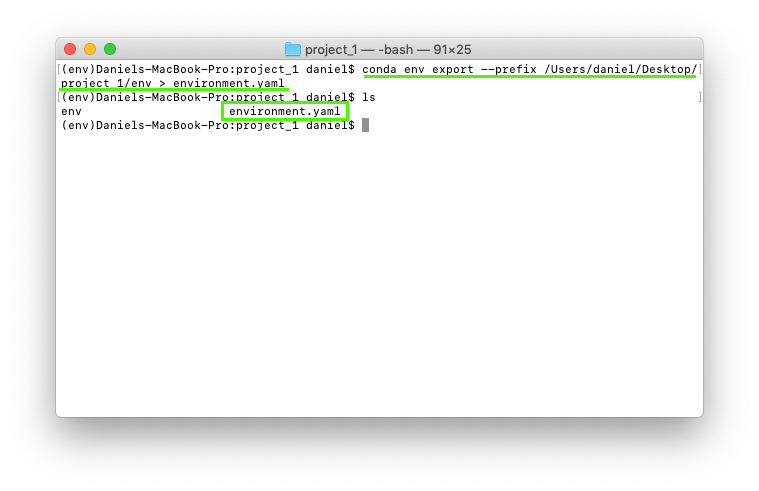
project_1 folder wasn't an option.After running the export command, we can see our new YAML file stored as environment.yaml.
A sample YAML file might look like the following:
name: my_ml_env
dependencies:
  - numpy
  - pandas
  - scikit-learn
  - jupyter
  - matplotlib
Your actual YAML file will differ depending on your environment name and what your environment contains.
Once you've exported your environment as a YAML file, you may want to share it with a teammate so they can recreate the environment you were working in. They might run the following command to create env2 using the environment.yaml file you sent them.
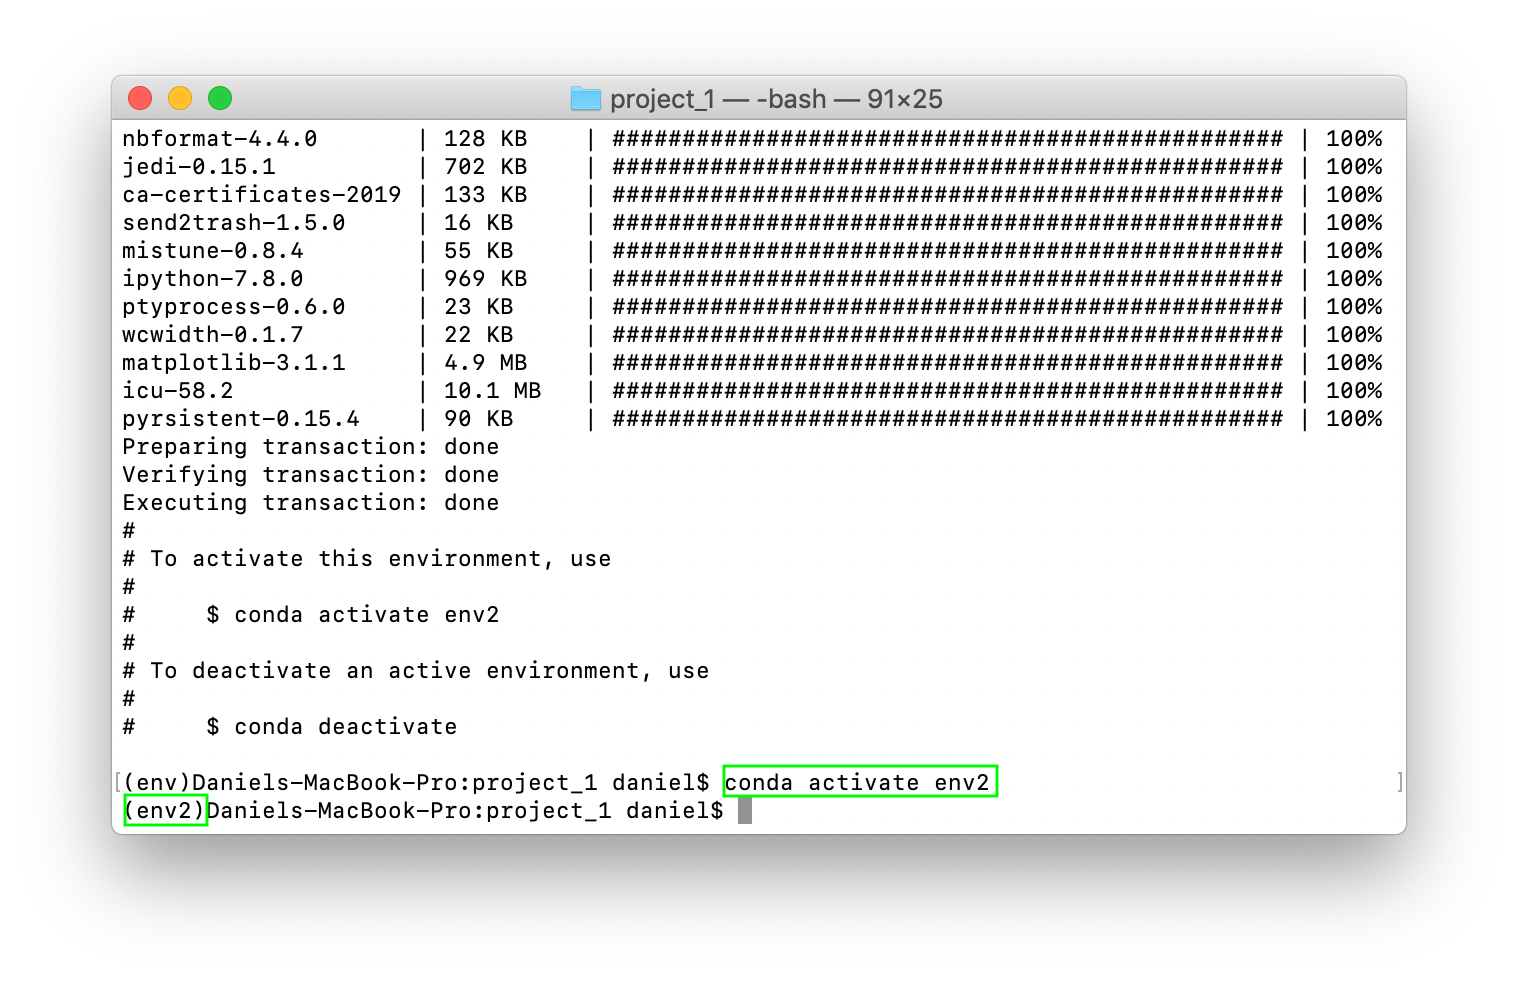
$ conda env create --file environment.yaml --name env2
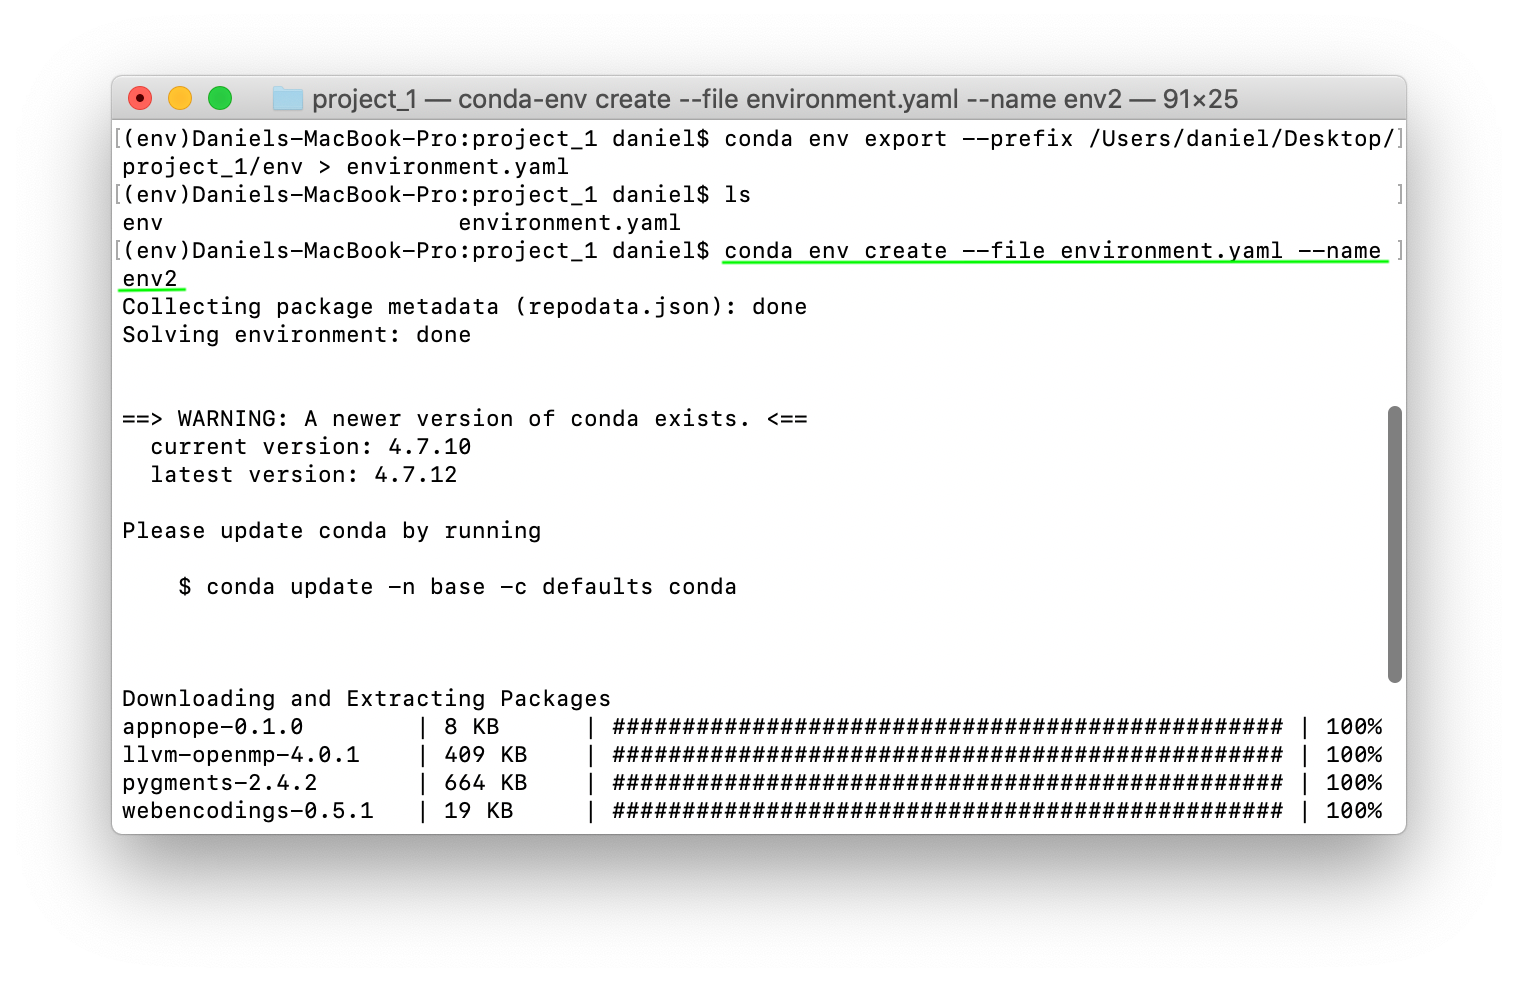
env2 like this ensures it will have all of the same tools and packages available within env. Which means your teammate will have access to the same tools as you.Once env2 has been created, you can access the tools within it by activating it using conda activate env2.
env2 has all the same packages and dependencies as env, activating it will mean you'll have access to the same tools as before.Resources
There's much more you can do with Anaconda, Miniconda and Conda and this article only scratches the surface. But what we've covered here is more than enough to get started.
If you're looking for more, I'd suggest checking out the documentation. Reading through it is what helped me write this article.
Don't worry if you don't understand something at first, try it out, see if it works, if it doesn't, try again.
A big shout out to the following for helping me understand Anaconda, Miniconda and Conda.
- Save the environment with conda (and how to let others run your programs) by Sébastien Eustace.
- Introduction to Conda for (Data) Scientists
- The entire Anaconda team and their amazing documentation
And Marcello Victorino for letting me know about all of the typos in this article.